Starting a Training Run
Before training a model, you must determine your training parameters, data processing settings, and various other critical details that will go into the Training Run. Chariot provides default settings for many of these variables, and you can choose from very minimal options in the Quick Start training template as outlined below.
If you would like greater control and specification over the model training process, we suggest researching the optimal settings for your use case and having this information available prior to starting a Training Run so that the process is smooth and effective. You can specify all your model parameters and settings in the Full Configuration template as outlined below. Your training parameters, data processing settings, and resource selections can be provided either via the UI or the Python SDK.
- UI
- SDK
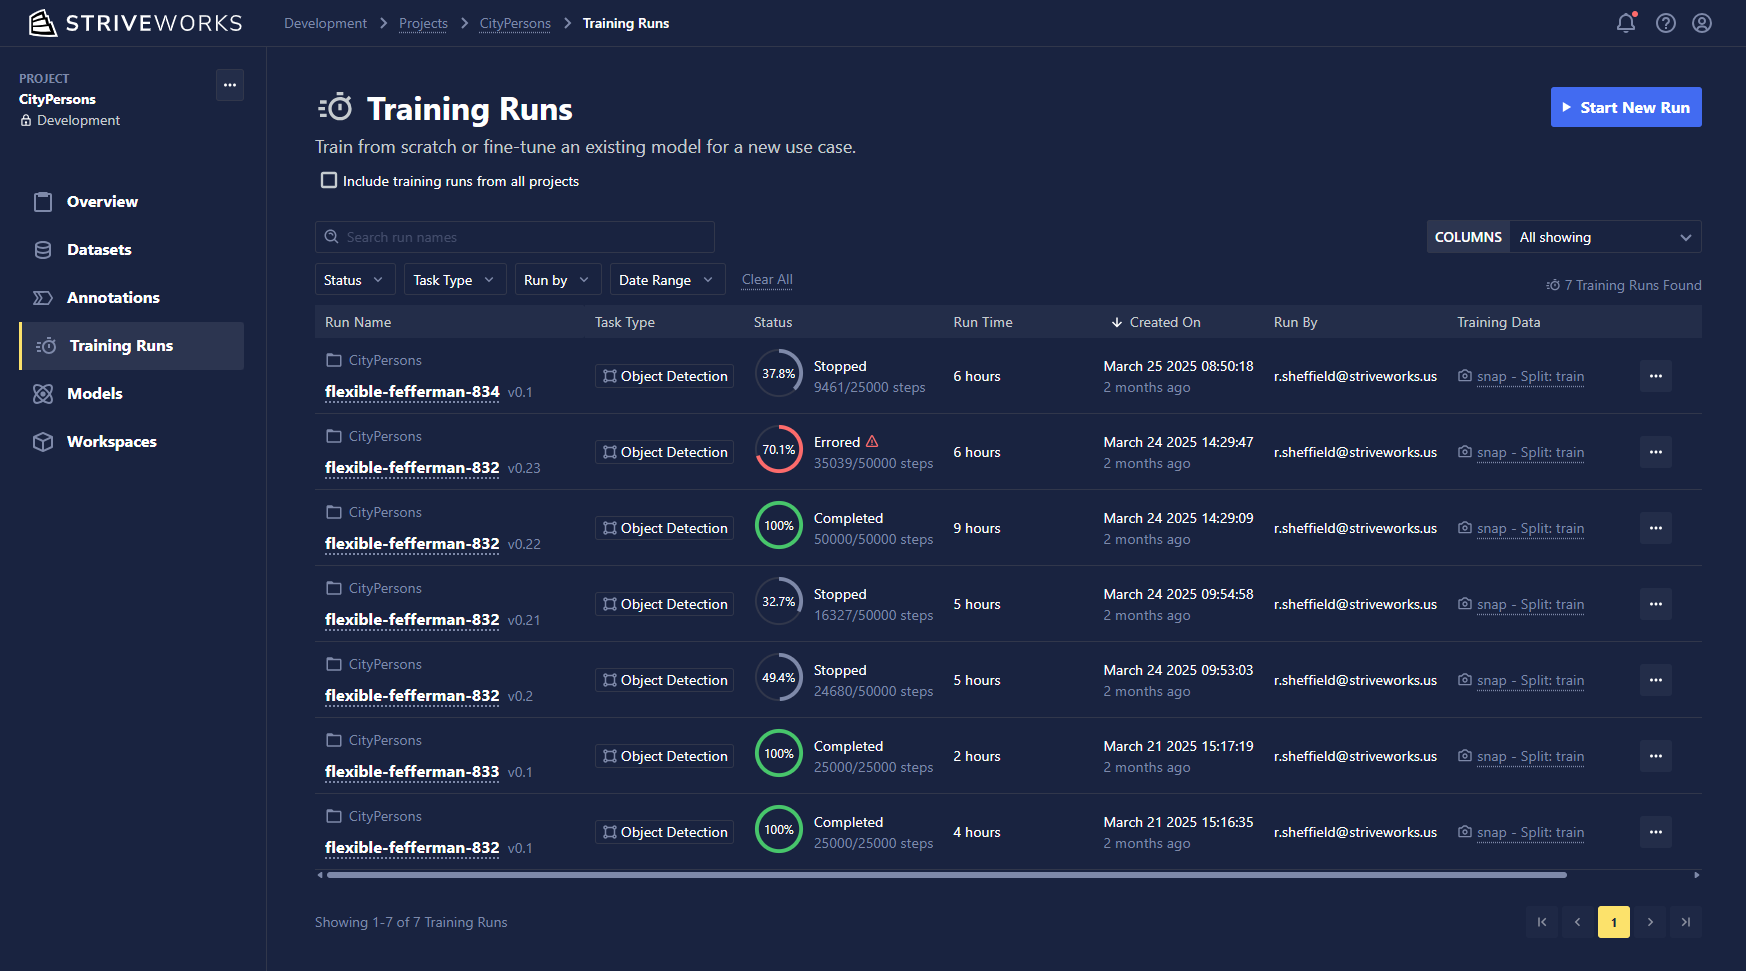
To start a Training Run from the Chariot UI, open the associated project, and click the Training Runs icon on the left-hand navigation bar. Click the Start New Run button to begin creating a Training Run in Chariot.
Select a Training Blueprint
Blueprints are training templates that guide you through different ways to train a machine learning model. You will see the following options to select from:
- Quick Start: This is a simple training template that is ideal for first-time users, less experienced practitioners, or those who simply wish to get started quickly!
- Full Configuration: This is a training template that provides a high degree of customization on model architecture, parameters, and other settings. This is ideal for data scientists who want to customize their Training Run based on experience, research, and use case.
- Any other custom Training Blueprints created by users in the project. (Click here for more information on Training Blueprints and how to create your own.)
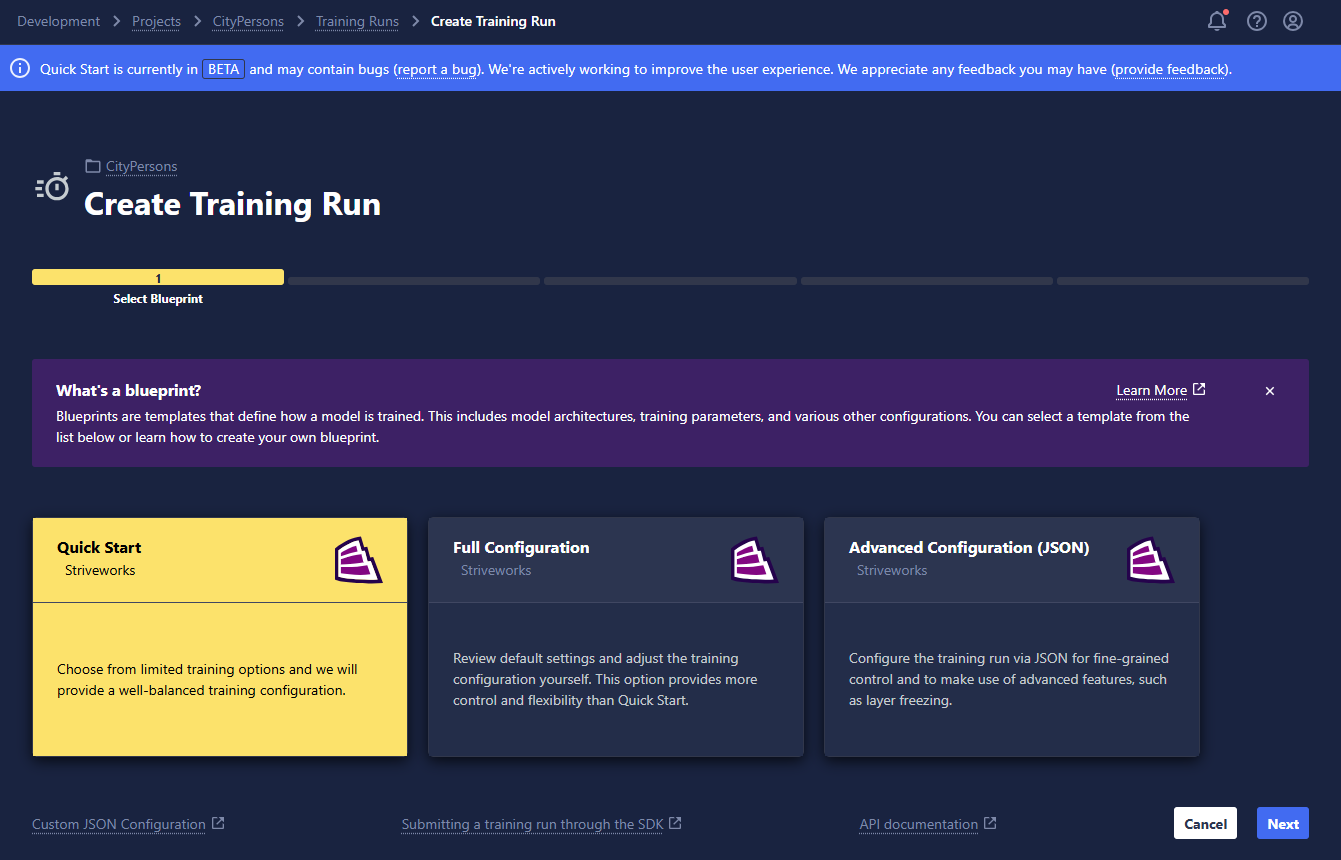
If you selected Quick Start, the following instructions will guide you through the remaining steps. If you selected Full Configuration, skip to the Full Configuration instructions.
Quick Start
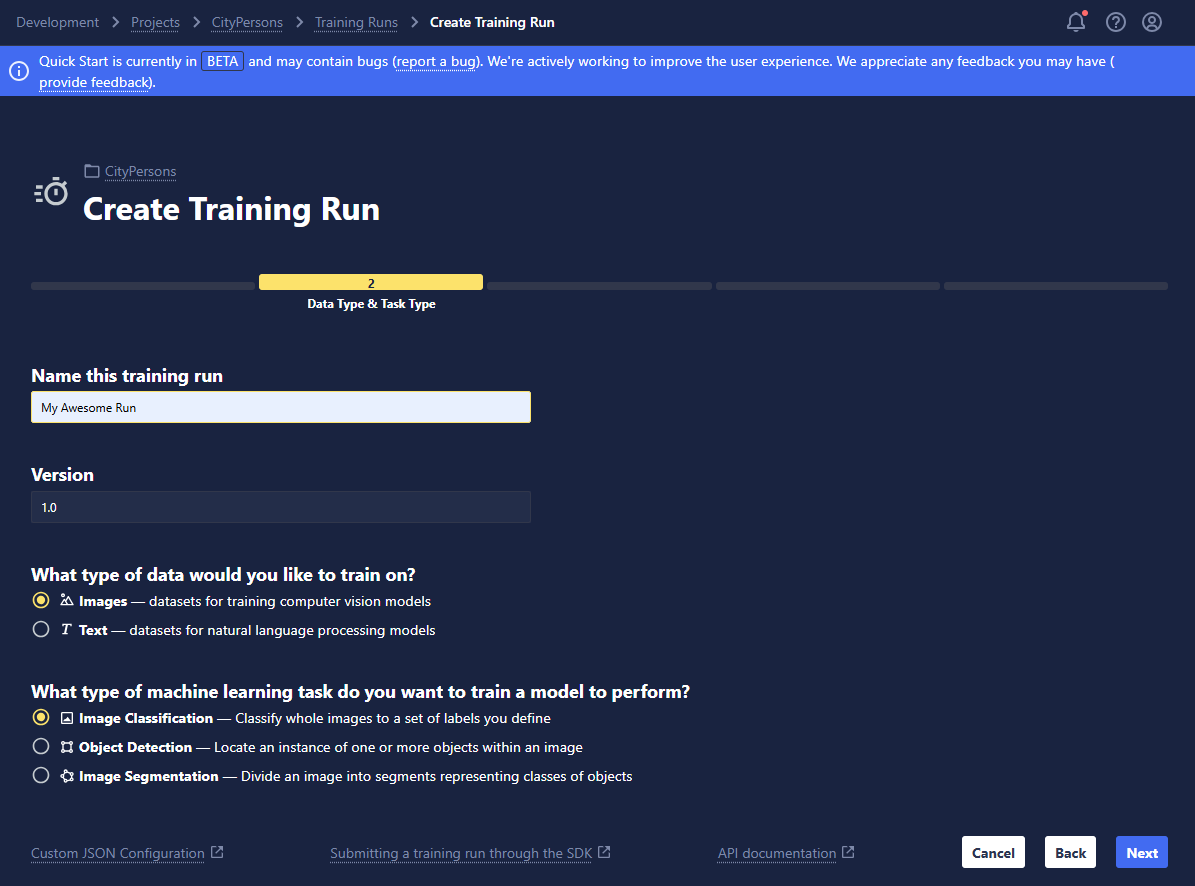
Name the Run and Specify the Task
- Name: Name your run whatever you'd like! We recommend including distinguishing characteristics in the name to help differentiate and manage your runs; this will be particularly helpful when you're viewing them in a list on the Training Run home page.
- Version: Set the version of this Training Run for your own records. By default, this will be set to 1.0, but it can be overridden by any string.
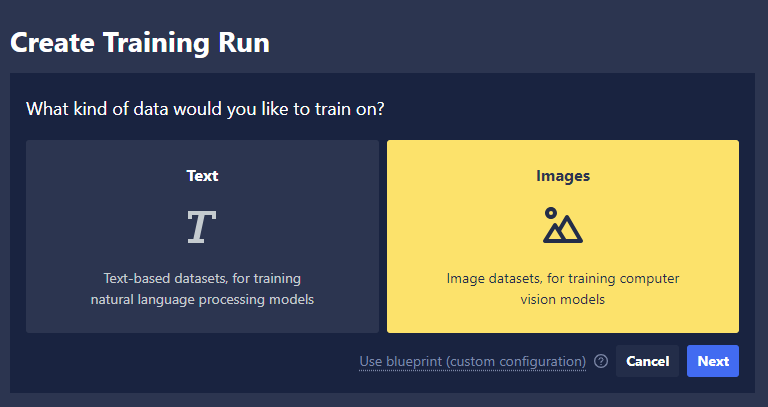
- Data Type: Select the kind of data you are training your model to make predictions on:
- Images: For training computer vision models
- Text: For training natural language processing models
- Task Type: Select the type of task your model will perform. Image classification, object detection, and image segmentation are available for computer vision model training while text classification and token classification are available for text-based natural language processing.
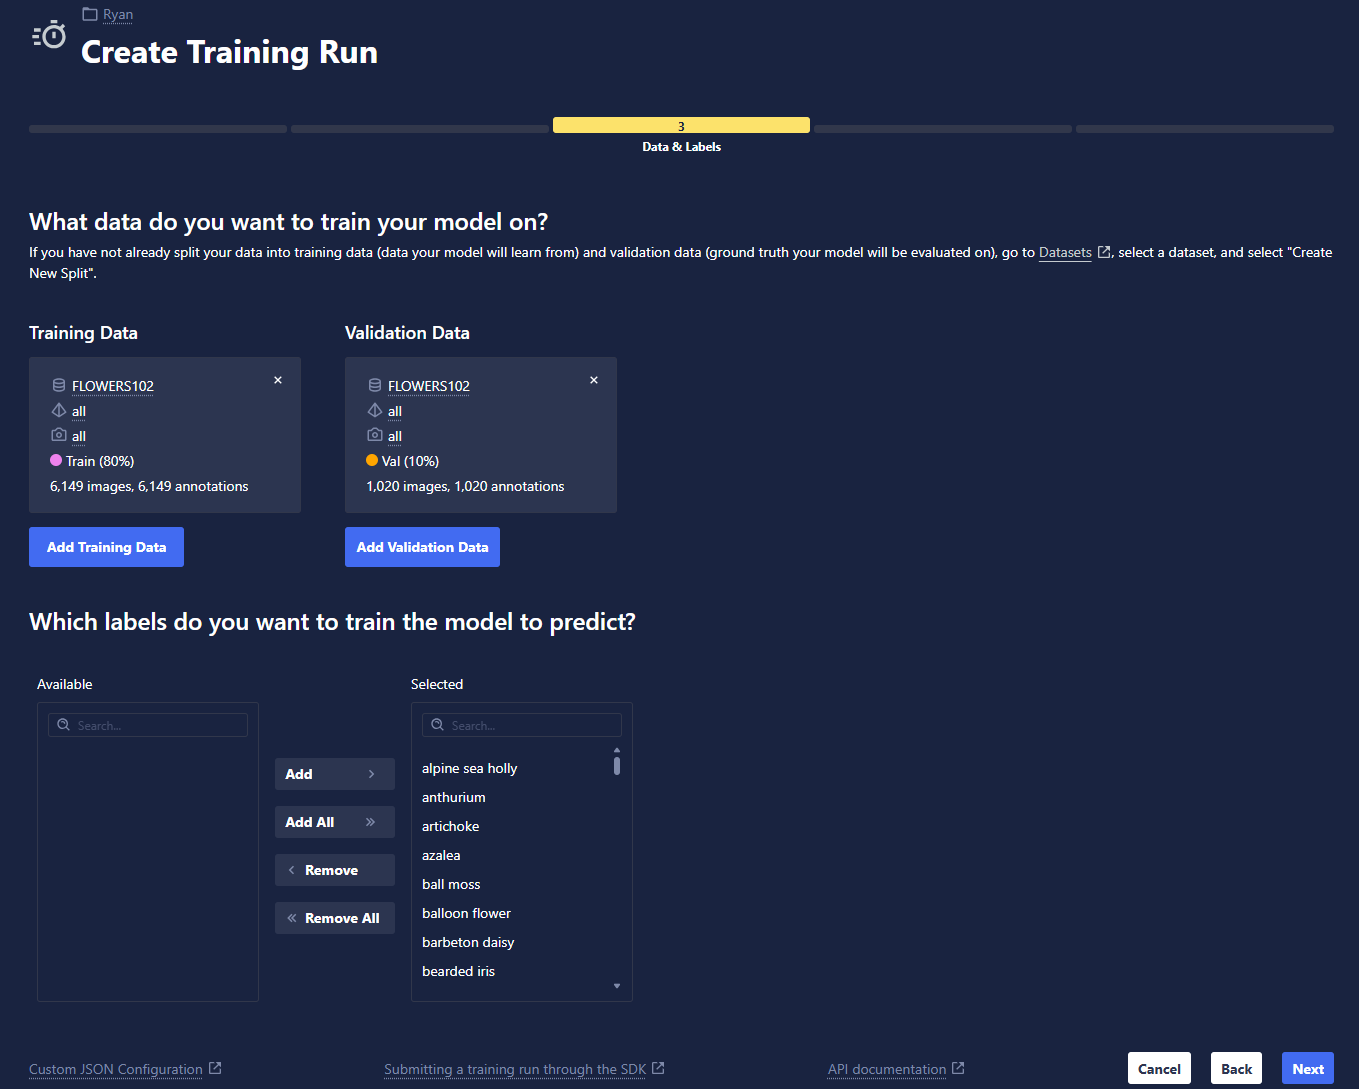
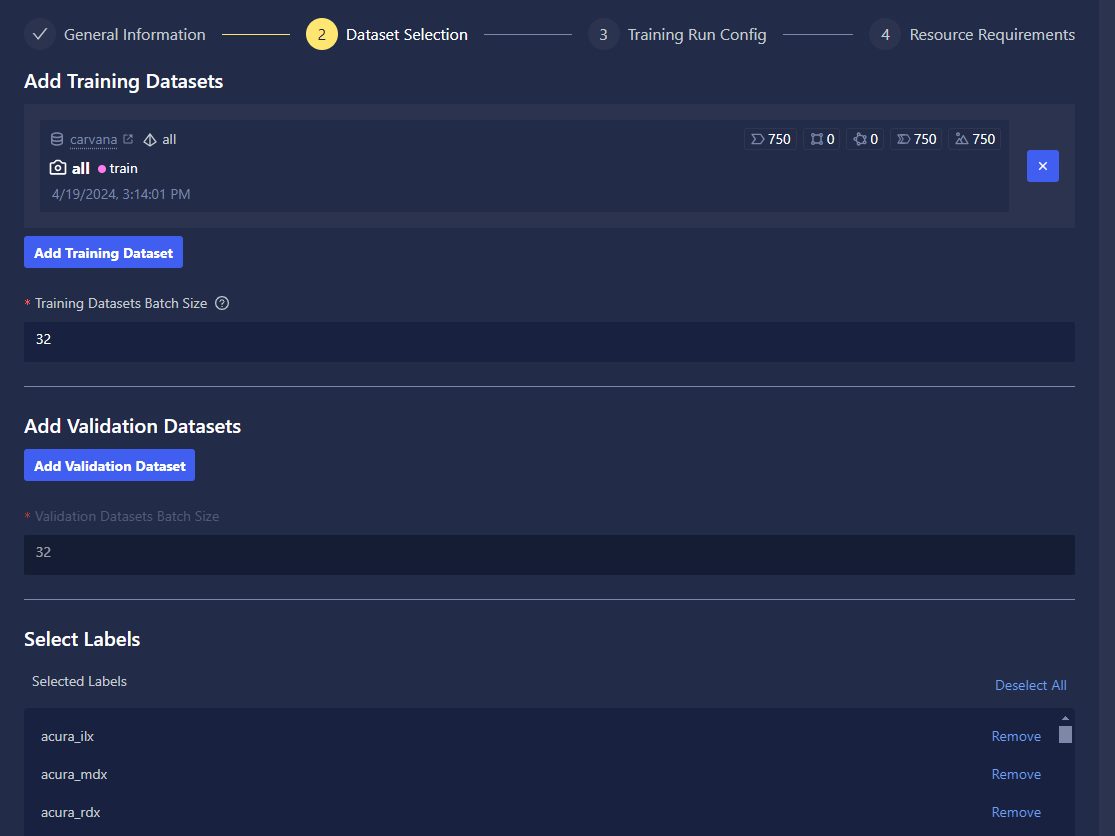
Select Your Dataset
- Add training dataset: Choose the training dataset you wish to train your model on, the specific View, and the Snapshot.
- Add validation dataset: Choose the validation dataset you wish to use during training to evaluate the performance of your model, the specific View, and the Snapshot.
- Negative samples: Select whether you would like to include negative samples (data that do not contain any cases of the selected labels you are training for) while training your model.
- Select labels: Choose a subset of the available classes of a dataset that you would like to train your model to predict.
Choose Your Model, Training Settings, and Resources:
In this simplified training template, select some basic training characteristics based on your needs.
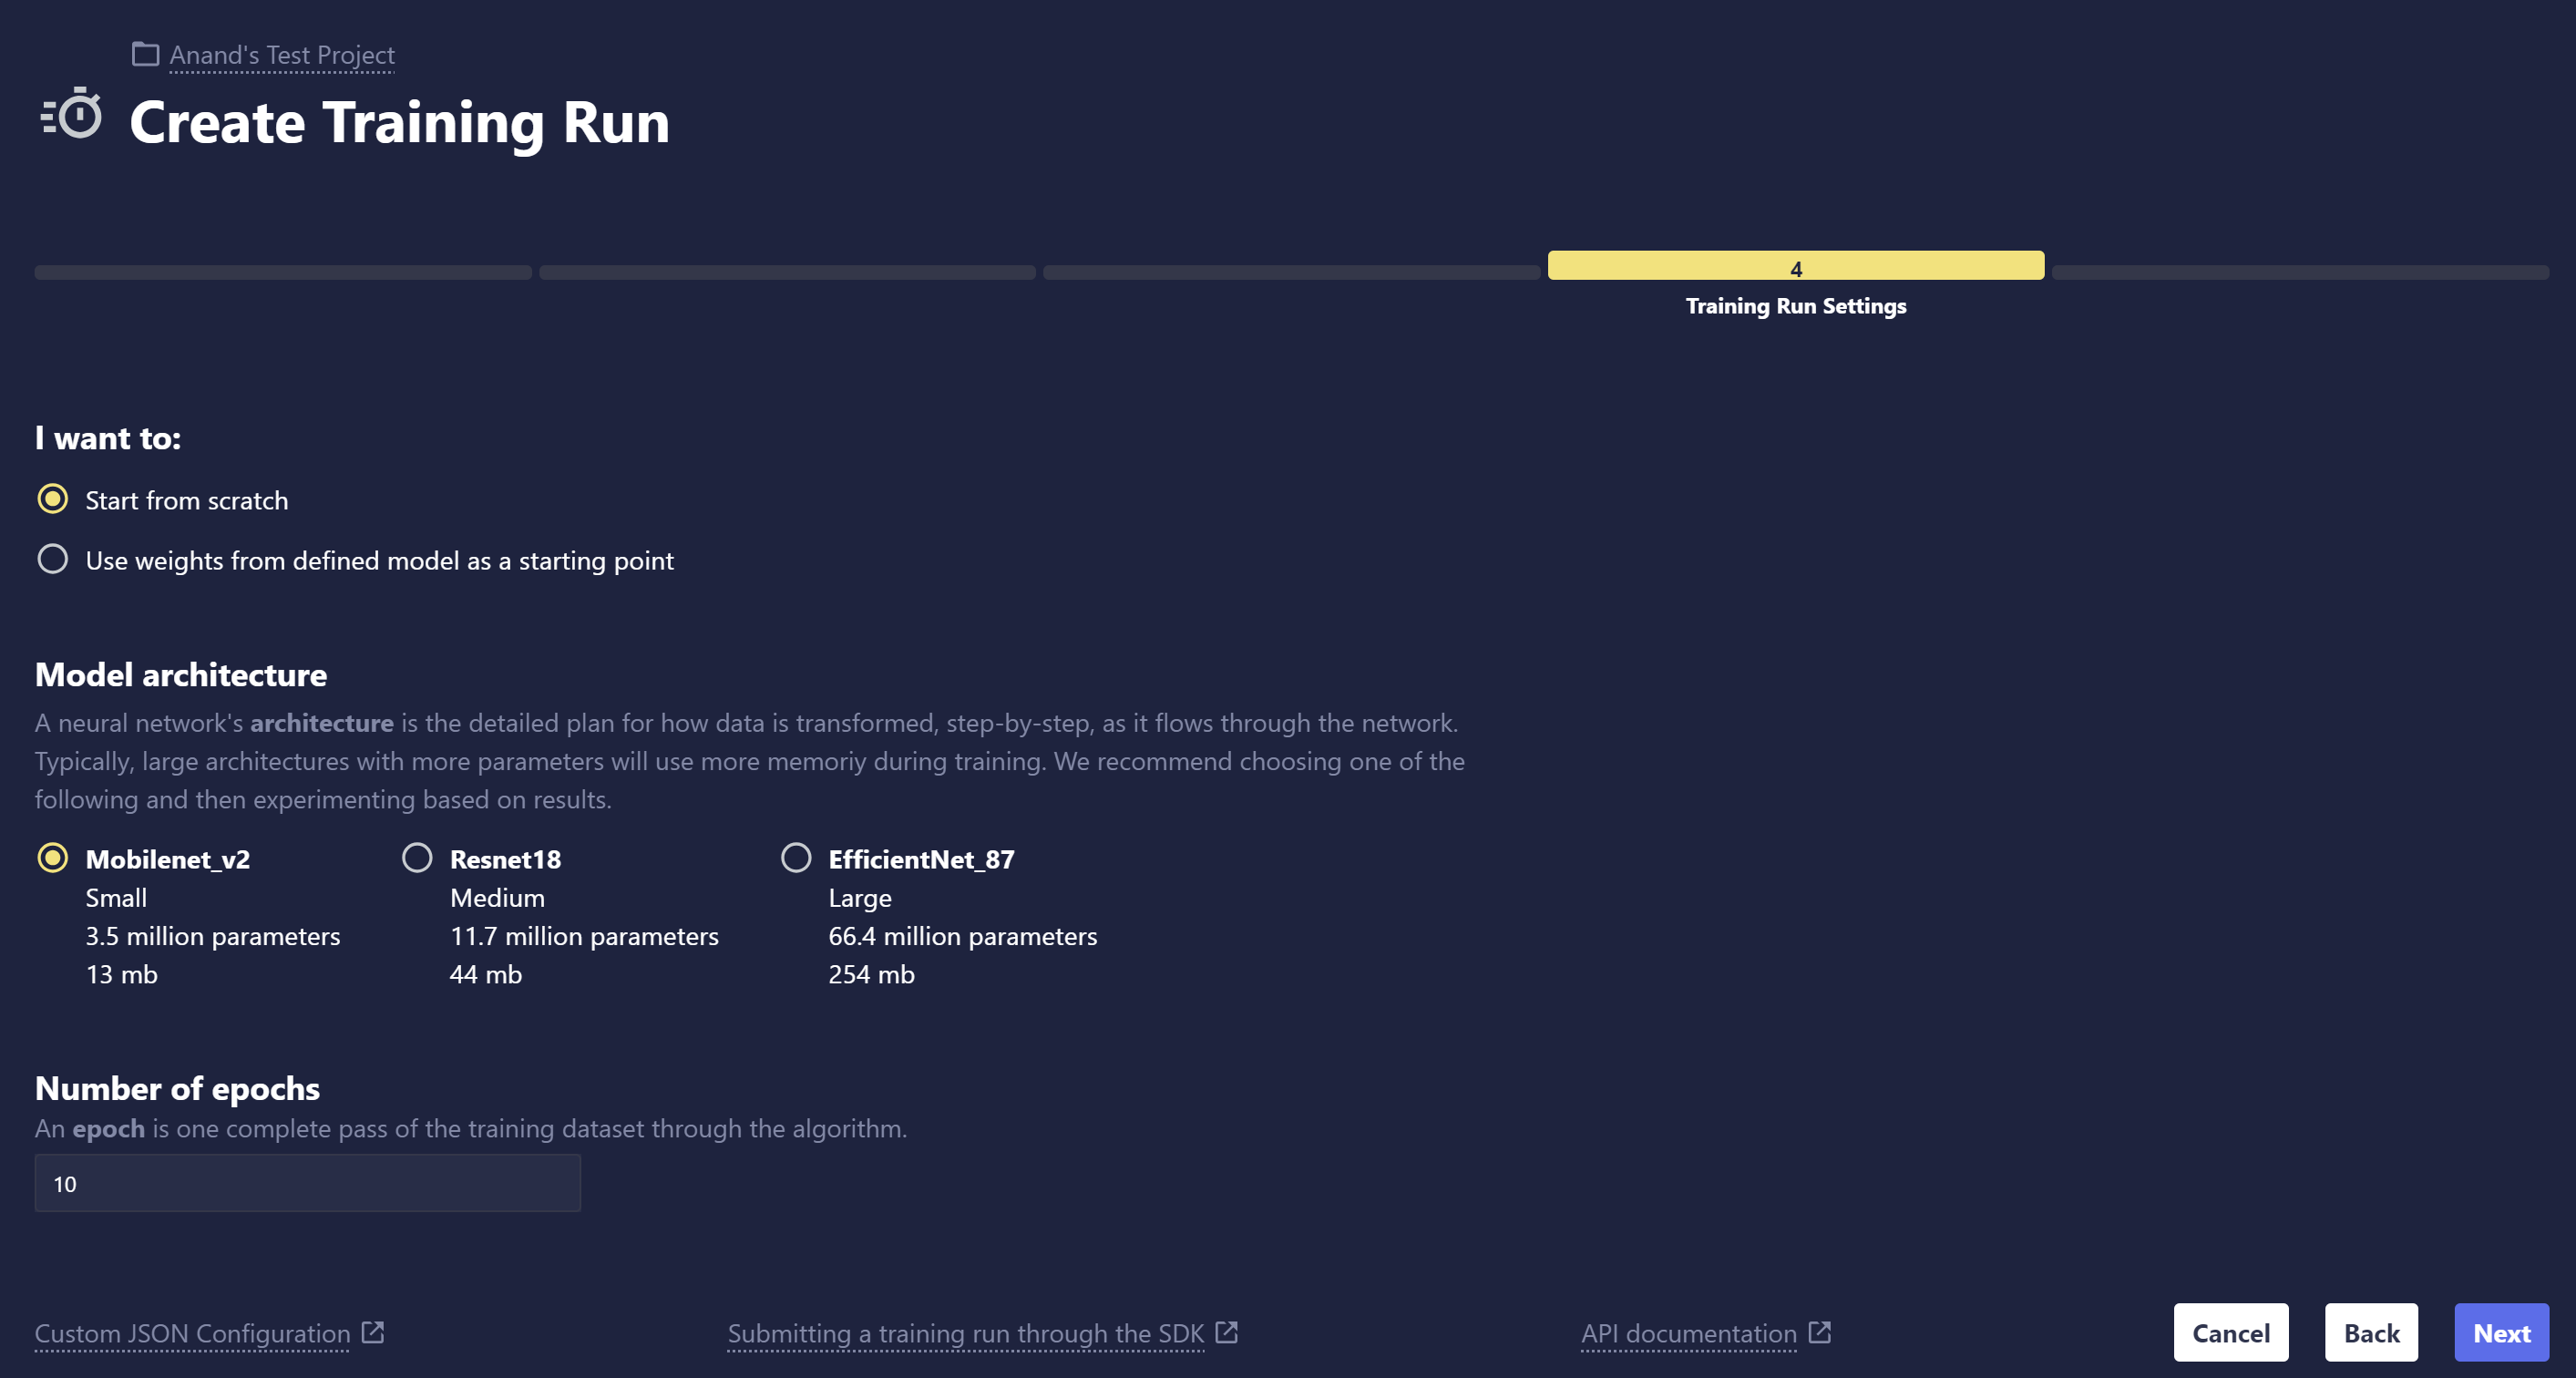
- Model settings: Choose Start from scratch to build your model without any preloaded model weights, or choose Start from previously trained model to fine-tune from an existing model in Chariot.
- Model architecture: If you choose to start from scratch, we provide three options for image classification model architectures that vary based on the size of the architecture. Typically, larger models require more computing power. The architecture that will best suit your use case varies widely based on many factors and can only be properly determined through experimentation. As a starting point, choosing a smaller model is a good way to get started and receive feedback to iterate on in the training process.
- Training length: Select the length of the Training Run. One epoch is one complete pass through the entire training dataset by the machine learning model. During each epoch, the model processes every data point in the training set once, adjusts its internal parameters (weights), and learns from the data.
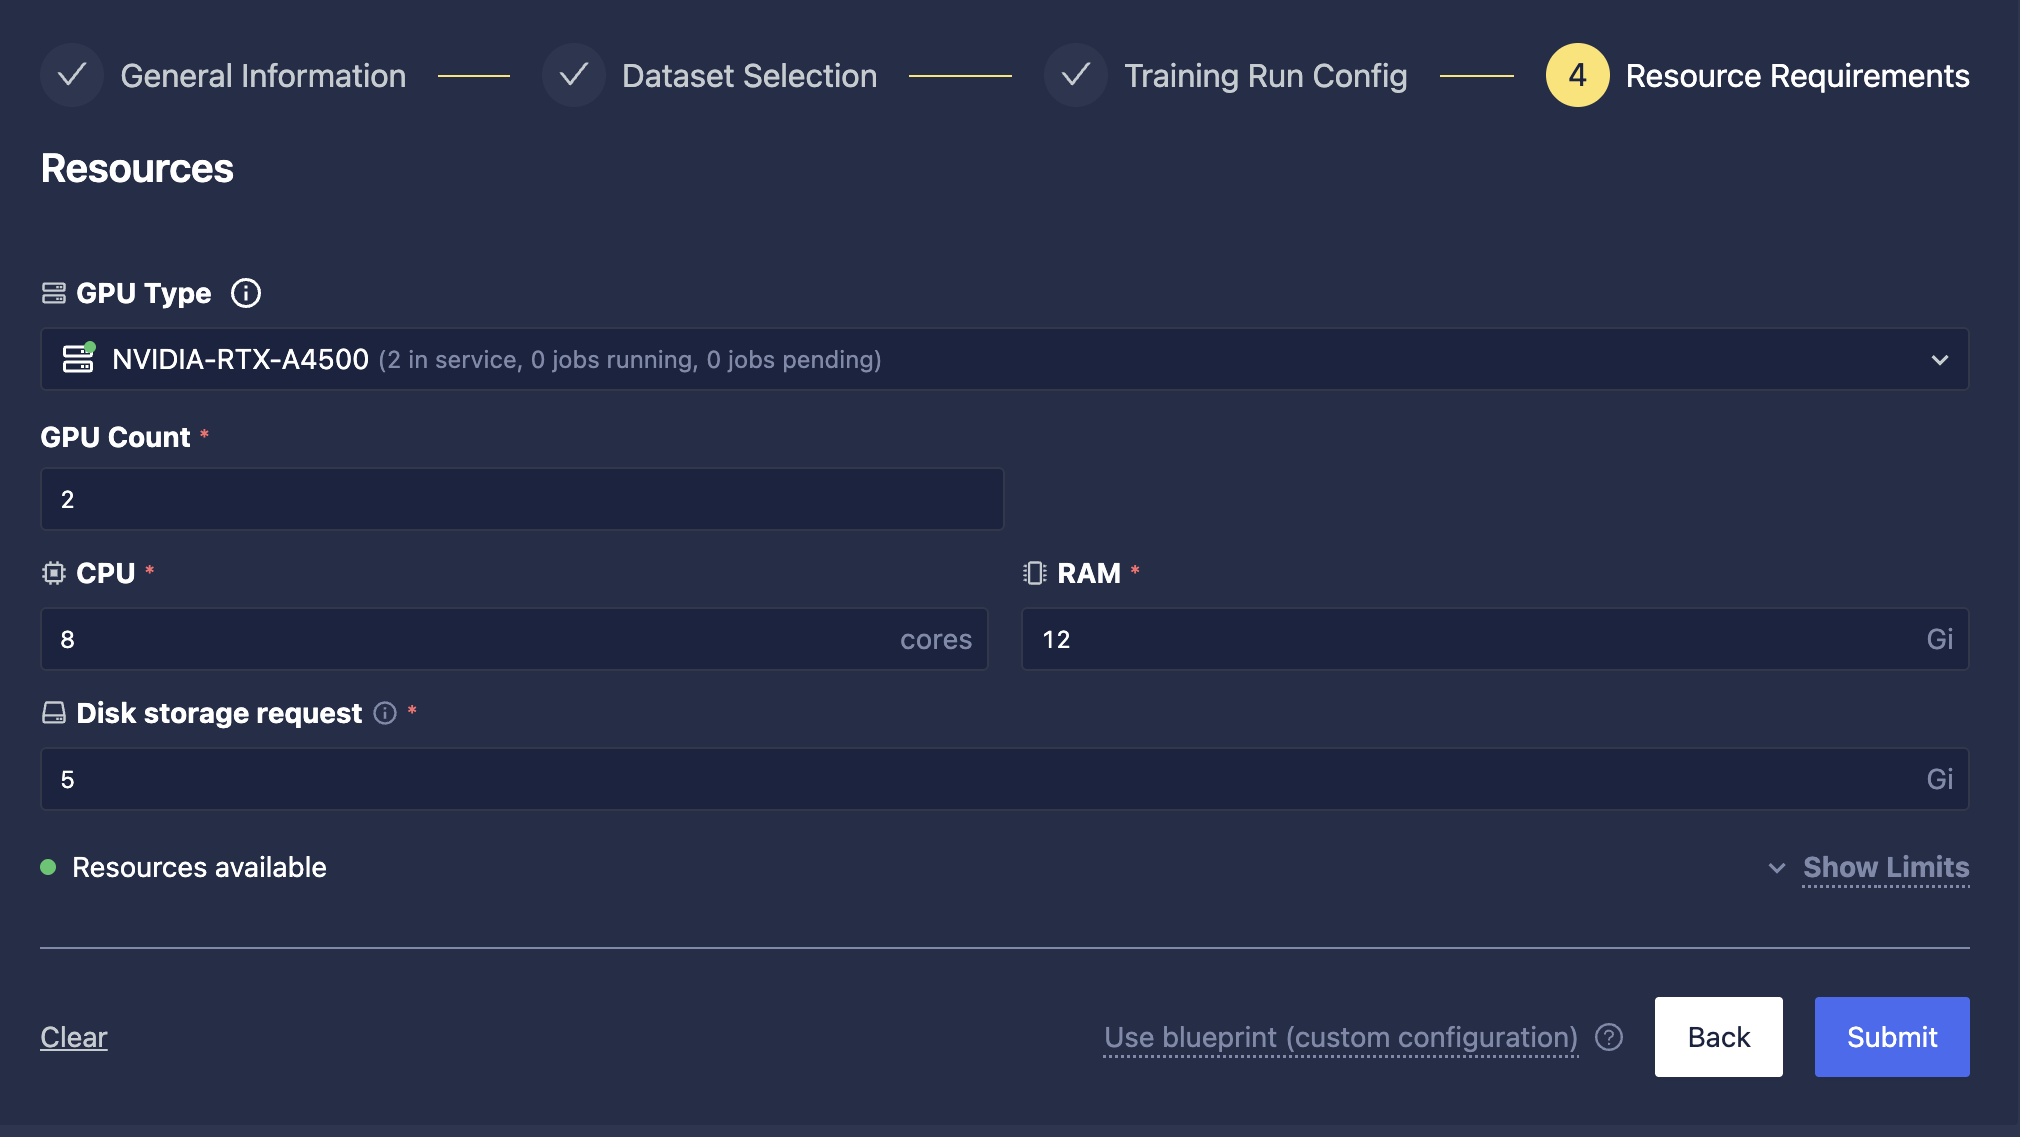
- Resource selection: Specify the allocation of GPU and CPU resources for your Training Run. Please note that usable compute resources may vary depending on the other entities that your organization is actively running, like Inference Servers, Workspaces, and other Training Runs. If your node has multiple GPUs and the Blueprint supports multi-GPU training, you can specify the desired GPU count from the drop-down menu; otherwise, the run will default to a single GPU if available and selected. Click Show Limits to get an idea of the limits of CPU cores and RAM that you can allocate for the run. The Resources Available message provides feedback on whether your chosen allotments are valid. For a more thorough deep dive into how to allocate resources effectively, refer to the Resource Management documentation.
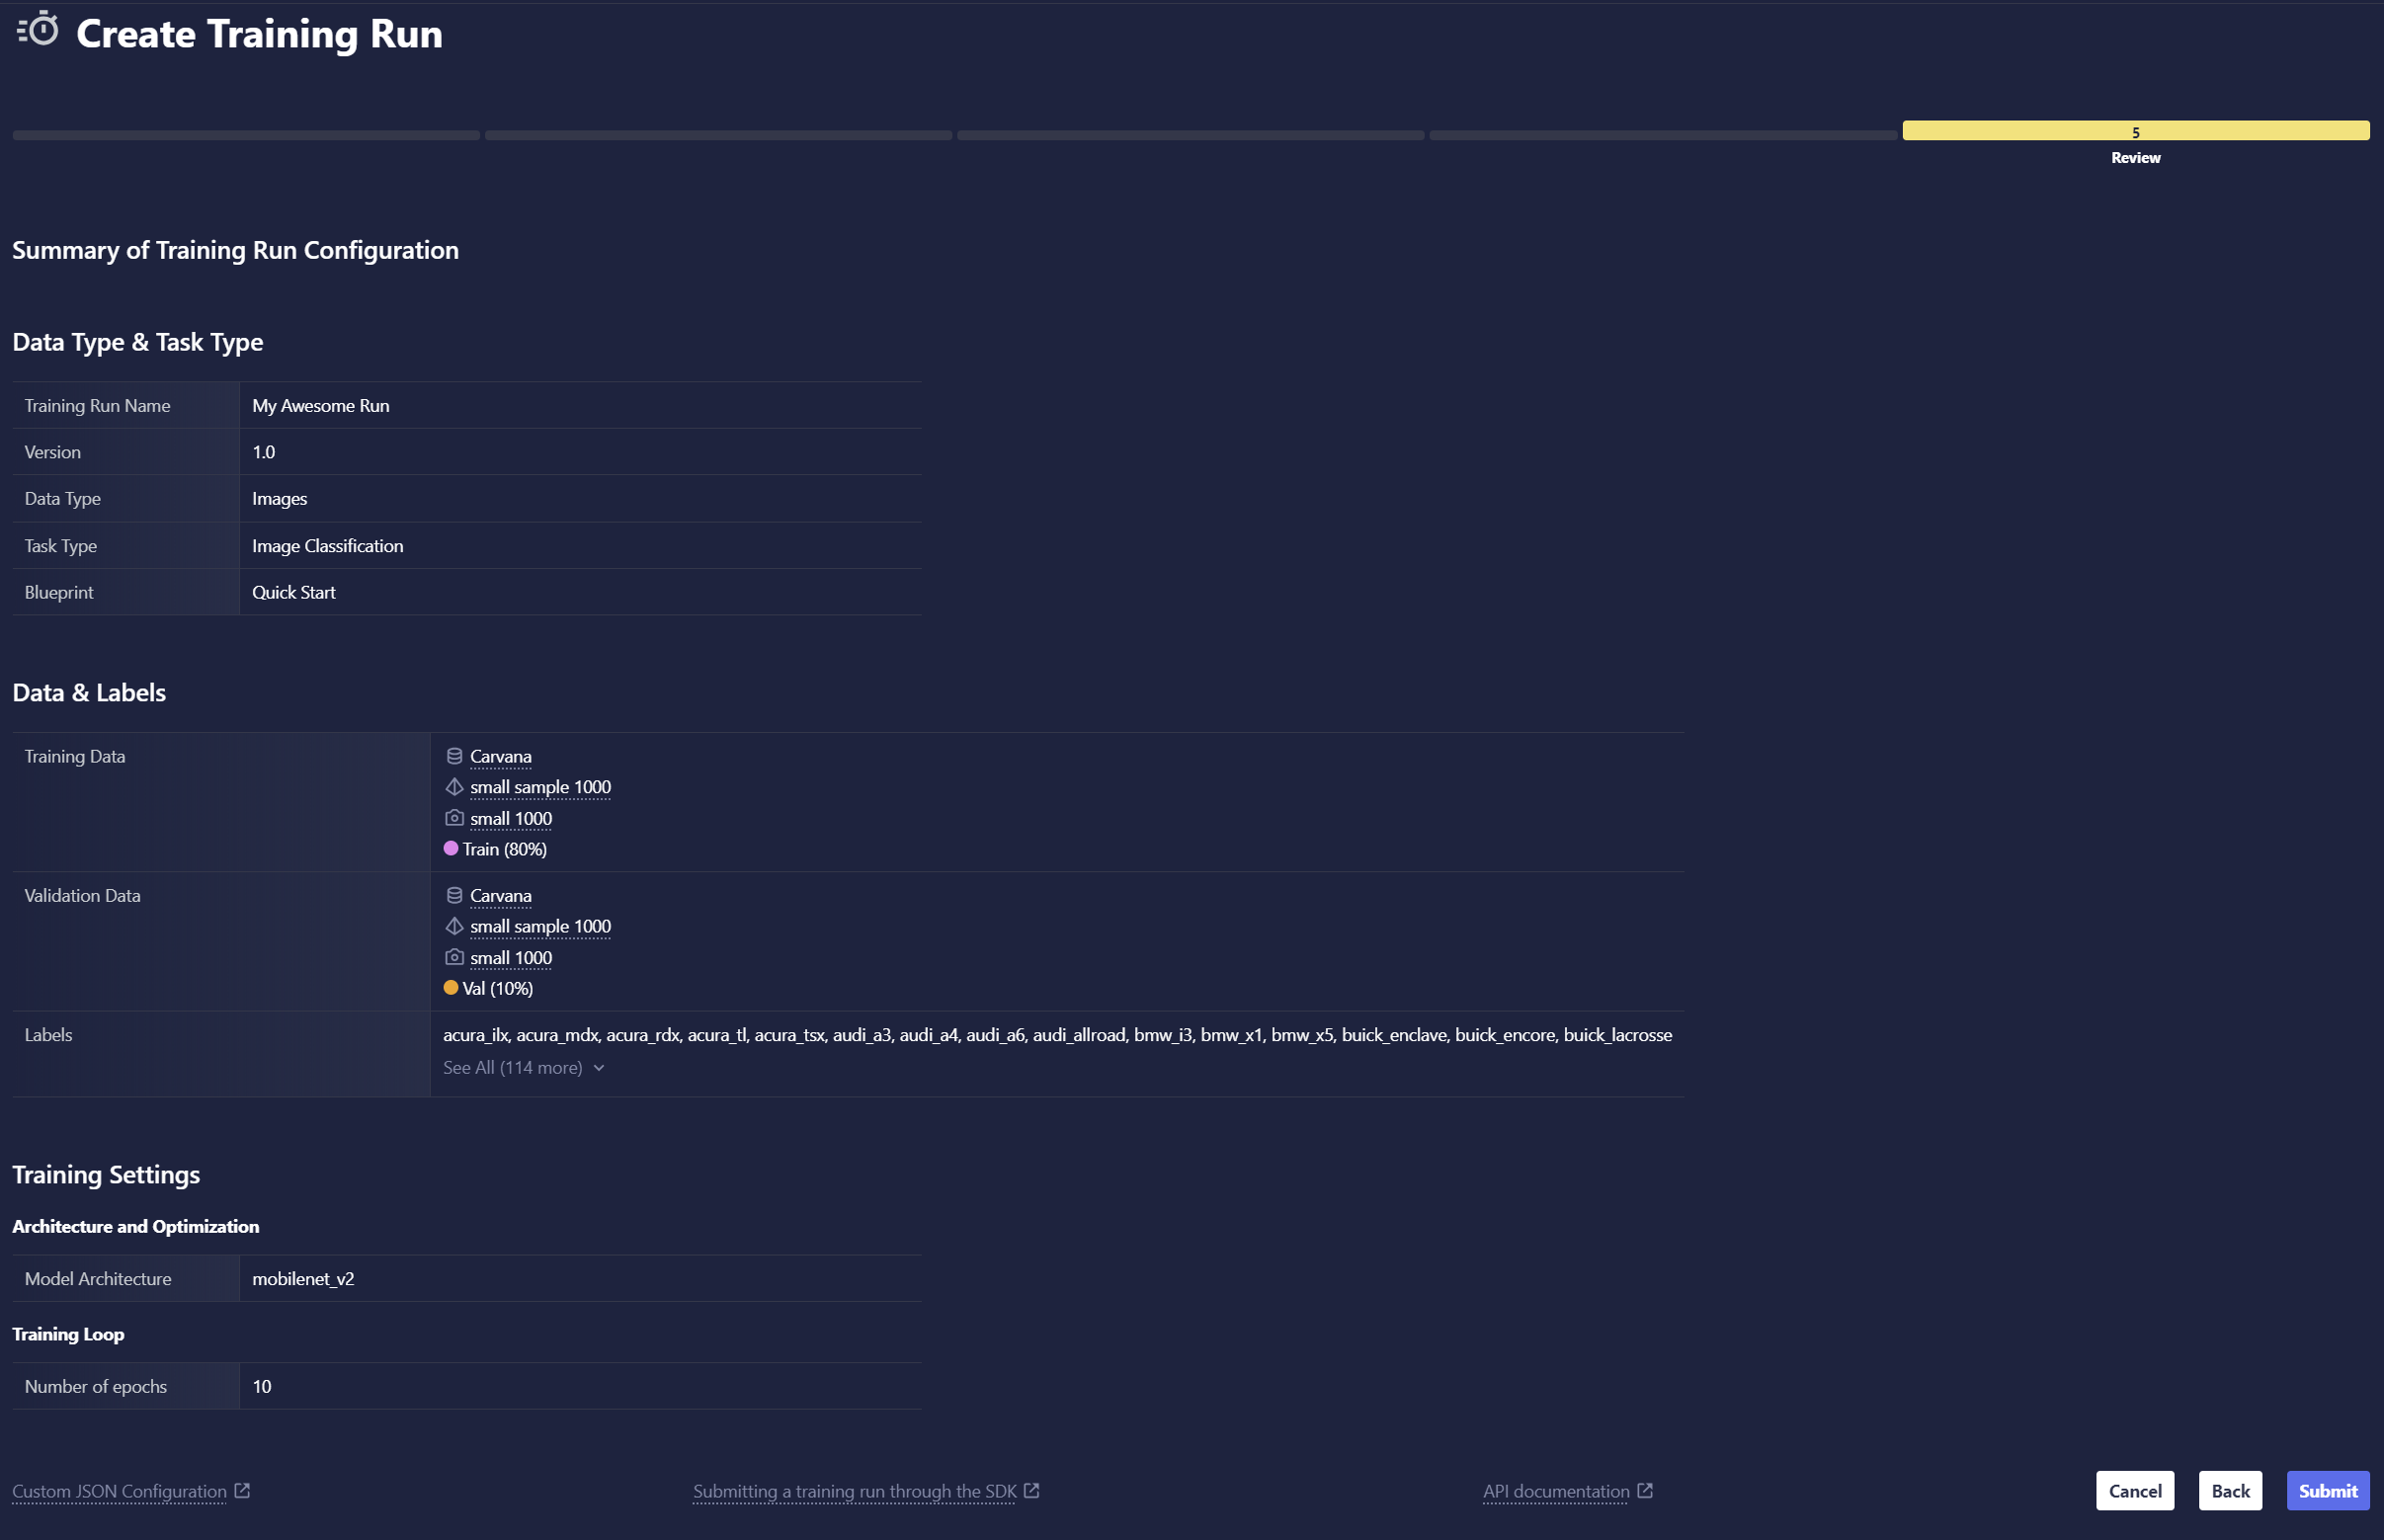
Review Your Selections
Review all the selections you made in prior steps. You can always go back to previous steps and edit any settings that you wish to change. When you're ready, click Submit to start training.
Full Configuration
Data Type Selection
Select the kind of data you are training your model to make predictions on and click Next.
- Images: For training computer vision models
- Text: For training natural language processing models
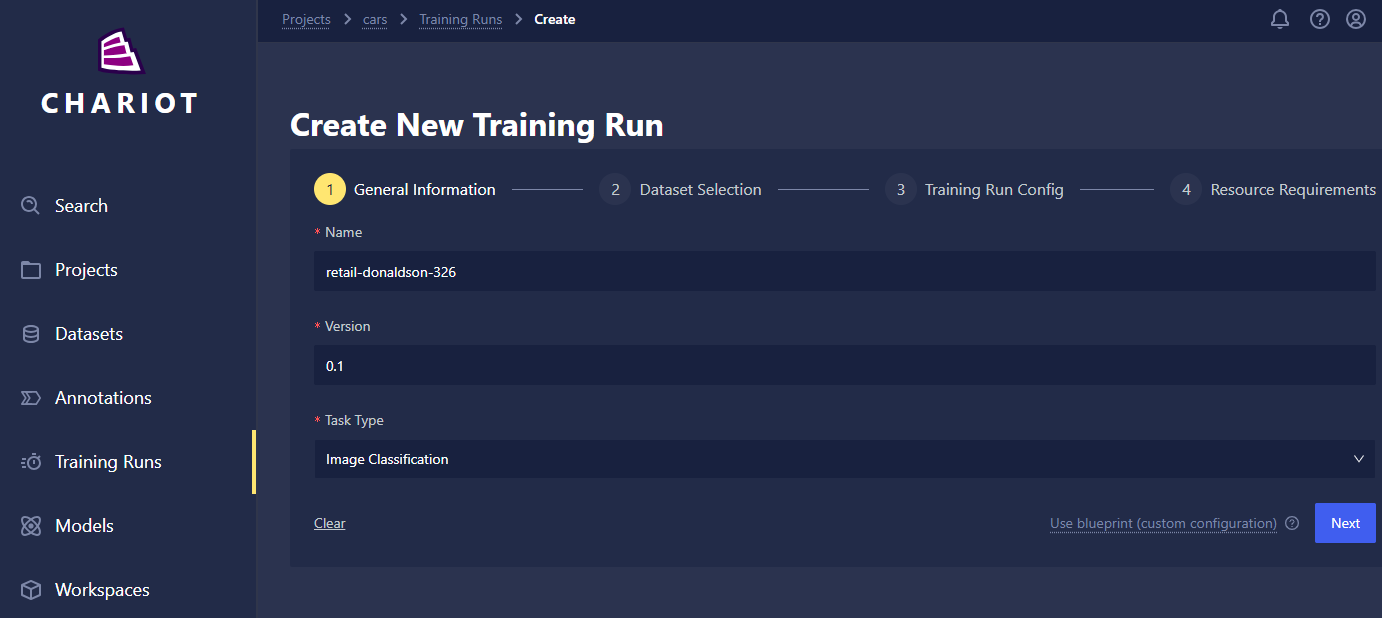
General Information
- Name: Name your run whatever you'd like! We recommend including distinguishing characteristics in the name to help differentiate and manage your runs; this will be particularly helpful when you're viewing them in a list on the Training Run home page.
- Version: Set the version of this Training Run for your own records. By default, this will be set to 0.1, but it can be overridden by any string.
- Task Type: Select the type of task your model will perform. Image classification, object detection, and image segmentation are available for computer vision models while text classification and token classification are available for text-based natural language processing models.
Dataset Selection
- Training and validation dataset selection: The training and validation dataset selection allows you to specify which Chariot-cataloged datasets to train/validate on.
- Label selection: The label selector allows training on a subset of the available classes of a dataset.
Training Settings
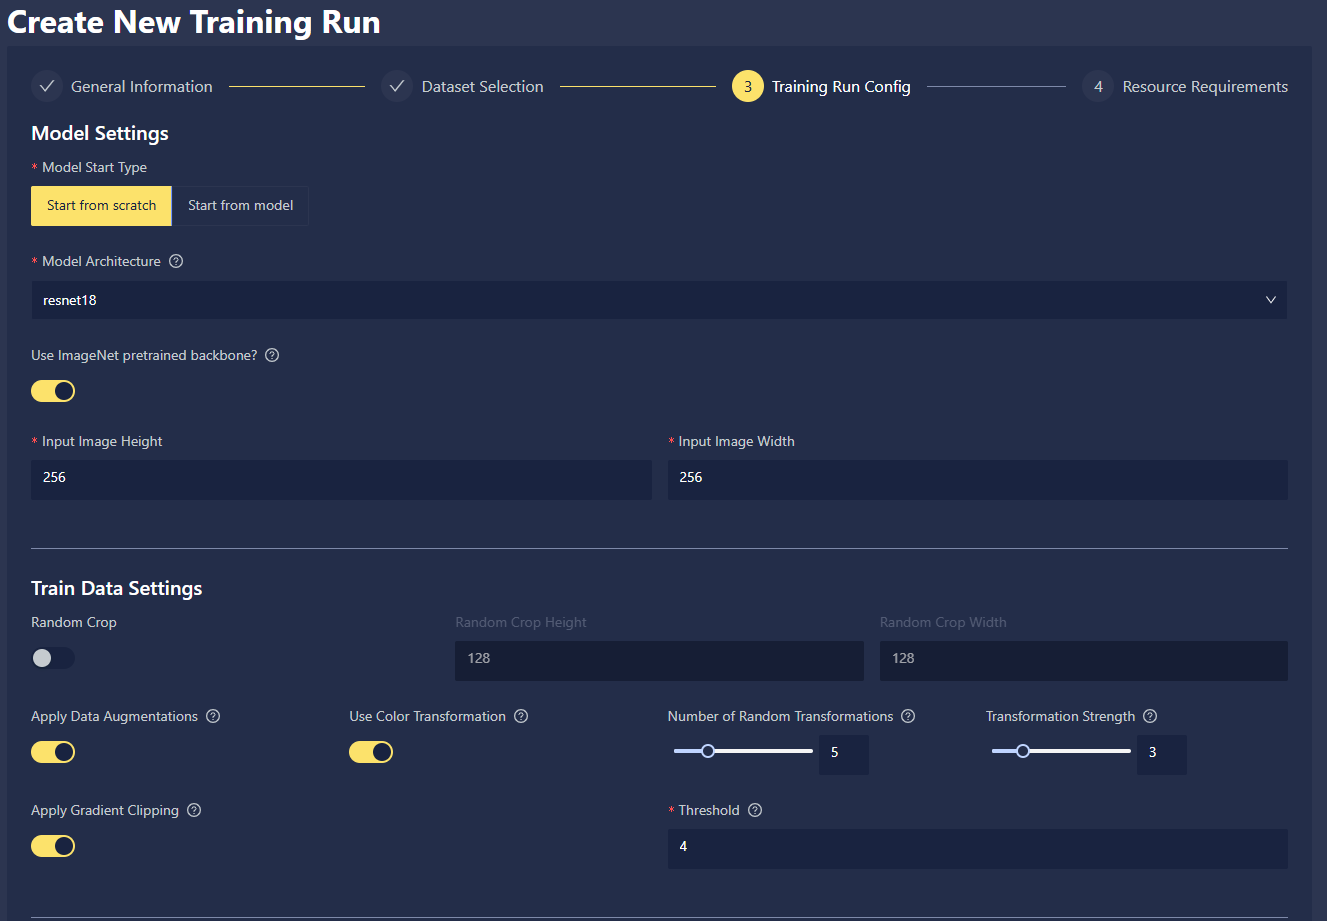
If you selected full configuration, you have the ability to completely customize your model settings and training parameters.
- Model settings: Choose Start from scratch to build your model without any preloaded model weights, or choose Start from model to fine-tune from an existing model in Chariot. When starting from scratch, you must choose a model architecture. For the complete list of supported model architectures, along with their sizes (number of parameters and depth) and relative inference speeds, navigate to the Neural Network Architecture page of our Data Science Fundamentals guide. For specific implementation details of the architectures, navigate to the PyTorch Document Library.
- Training data settings: You can choose to apply augmentations to your training data, which is applied based on the RandAugment strategy. If this fits your use case, you can read more about data augmentations in the Data Science Fundamentals guide.
- Random crop: A type of data augmentation that simply chooses where to crop at random.
- Apply gradient clipping: Option to prevent model over-correction during training.
- Apply data augmentations: This option enables various data augmentations like rotation or horizontal shear.
- Use color transformation: This option allows you to utilize computer vision color transformation, including auto contrast, brightness, color, contrast, equalize, posterize, sharpness, solarize, and invert.
- Number of random transformations: This option allows you to set the number of random transformations applied during the Training Run.
- Transformation strength: This option allows you to set the strength of transformation applied in the above settings.
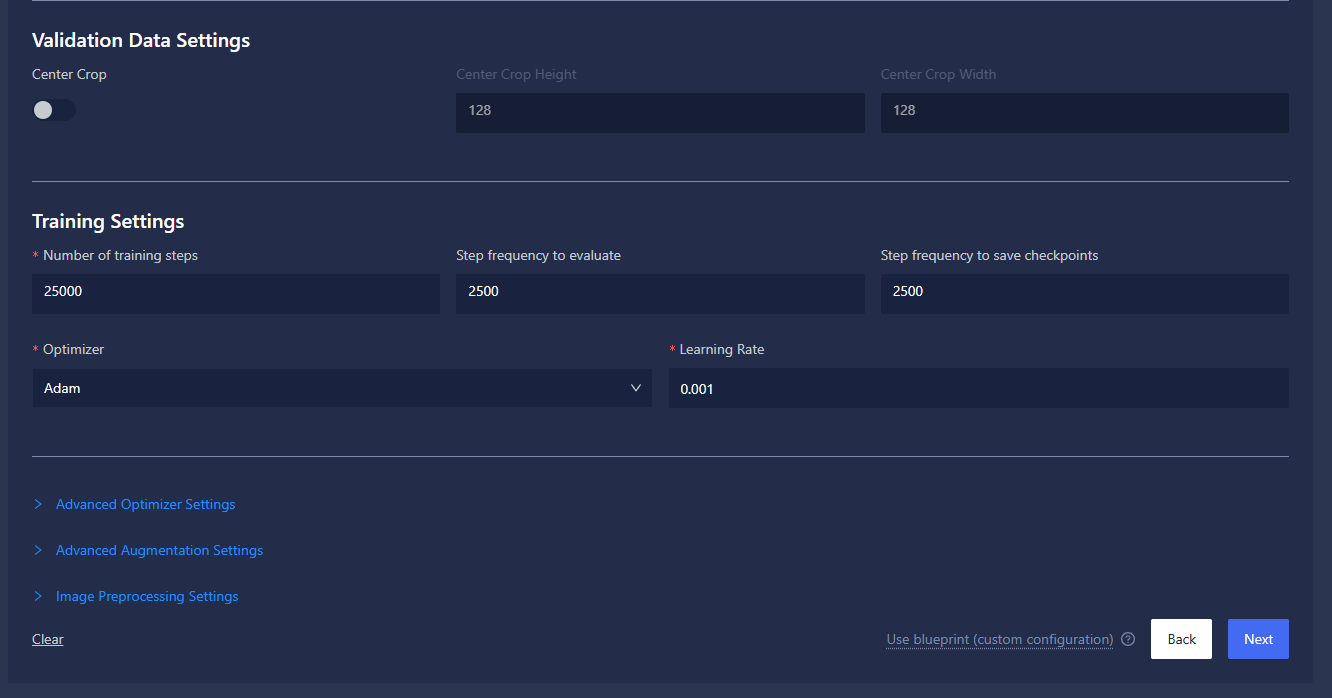
- Validation data settings:
- Center crop: This option allows you to enable the center crop transformation for data validation so that images can be cropped to target aspect ratio.
- Center crop height: This option allows you to set the height dimension for the target transformation ratio.
- Center crop width: This option allows you to set the width dimension for the target transformation ratio.
- Training settings:
- Number of training steps: This option allows you to set the number of optimizer steps to train for; note that this is not the number of epochs but rather the number of mini batches processed by the trainer.
- Step frequency to evaluate: This option allows you to set how often to run evaluation against the provided validation dataset.
- Step frequency to save checkpoints: This option allows you to set how often to save model checkpoints, which you can use to resume a run if it gets prematurely stopped either manually or by a system failure. It can also be exported to the models feature.
- Optimizer: You have the option to use any of the PyTorch optimizers.
- Learning rate: This configuration controls the step size during optimization. It determines how much model weights are updated in response to the gradient of the loss function. See Learning Rate for more information.
- Advanced optimizer settings: You have the option to define the selected optimizers' parameters.
- Advanced augmentation settings: Allows disabling of specific data augmentations and color transformations if you have those applied.
- Image preprocessing settings: Contains configuration options for Linear Stretch and CLAHE.
Resource Requirements
- Specify the allocation of GPU and CPU resources for your Training Run. Please note that usable compute resources may vary depending on the other entities that your organization is actively running, like Inference Servers, Workspaces, and other Training Runs. If your node has multiple GPUs and the Blueprint supports multi-GPU training, you can specify the desired GPU count from the drop-down menu; otherwise, the run will default to a single GPU if available and selected. Click Show Limits to get an idea of the limits of CPU cores and RAM that you can allocate for the run. The Resources Available message provides feedback on whether your chosen allotments are valid. For a more thorough deep dive into how to allocate resources effectively, refer to the Resource Management documentation.
- Training and validation data
from chariot.datasets import Dataset
from chariot.client import connect

connect()

# Get the train and val versions of the datasets.
ds = Dataset(
   name="<NAME OF DATASET>",
   project_name="<PROJECT NAME (OPTIONAL)>",
)
train_version = [v for v in ds.versions if v.split == "train"][0] #ensure "train" matches your expected split name
val_version = [v for v in ds.versions if v.split == "val"][0] #ensure "val" matches your expected split name
- Model configuration
Model configuration is defined by:
architecture: A string specifying which architecture to use. This depends on the given task.input_size: This is an object that specifies how the images should be resized. This is necessary for classification and detection tasks but optional for segmentation.
For this example, we will use the following configuration:
model = {'architecture': 'mobilenet_v3_small', 'image_net_pre_trained': True, 'input_size': {'height': 32, 'width': 32, 'apply': True}}
- Optimizer configuration
The optimizer is an object that has the following two required fields:
name: This is a string specifying which optimizer to use. See the PyTorch docs for details on the available optimizers. Typically,Adamis a good choice.learningRate: This is the learning rate to use. Typical good choices are between (0.0001 and 0.001).
We will use the following for the optimizer in this example:
optimizer = {'name': 'Adam', 'kwargs': {'learningRate': 0.001}}
- Putting it all together
Construct your Training Run configuration:
train_dsv = [{
   "id": train_version.dataset_id,
   "version_id": train_version.id,
   "project_id": train_version.project_id,
}]

val_dsv = [{
   "id": val_version.dataset_id,
   "version_id": val_version.id,
   "project_id": val_version.project_id,
}]

labels = ["building"]  # a list of labels that we're training against

train_kwargs = {
   "n_global_steps": 10,             # how many optimizer steps to train for
   "global_step_eval_freq": 10,      # how frequently to evaluate
   "global_step_save_ckpt_freq": 10, # how often to save checkpoints
}

config = {
   "runform": {
         "train_data": {
            "datasets": train_dsv,
            "batch_size": 4,
         },
         "val_data": {
            "datasets": val_dsv,
            "batch_size": 4,
         },
         "optimizer": optimizer,
         "task_type": "Image Segmentation",
         "labels": labels,
         "model": model,
   },
   "train_kwargs": train_kwargs,
}
Retrieve the appropriate Blueprint ID for your run:
from chariot.training_v2 import lookup_blueprint_id

blueprint_id = lookup_blueprint_id(name="teddy_wizard")
Blueprints currently provided with Chariot include "teddy" and "teddy_wizard".
When constructing your config payload for Training V2, you can validate it prior to starting a run. You can do so with the following code:
from chariot.training_v2 import validate_run_config

validate_run_config(blueprint_id=blueprint_id, config=config)
To retrieve available GPUs:
from chariot.system_resources import get_available_system_gpus

print(get_available_system_gpus())
Now, with the correct project_id, you have everything you need to start a run:
from chariot.projects import get_project_id
from chariot.training_v2 import create_run, Resources, Gpu

project_id = get_project_id(project_name="<PROJECT NAME>")
run_id = create_run(
   config=config,
   name="<NAME OF RUN>",
   version="1",
   resources=Resources(cpu="1", memory="2Gi", ephemeral_storage="2Gi", gpu=Gpu(count=1, type="Tesla-T4")),
   task_type="Image Segmentation",
   project_id=project_id,
   blueprint_id=blueprint_id,
   notes="experimenting with new model architecture."
)
Appendix
Sizes of Available Models
The size of a model depends on the number of trainable parameters it has. This is often a consideration when choosing a model as larger models tend to take longer to train but often have the capability to be more accurate. The following table lists models that are currently supported in Chariot and their sizes.
We call a model "small" if it has fewer than 10,000,000 trainable parameters, "medium" if it has between 10,000,000 and 30,000,000 trainable parameters, and "large" if it has more than 30,000,000 trainable parameters.
- Image Classification
- Object Detection
- Image Segmentation
| Model Name | Architecture | Size | Number of Trainable Parameters | Memory Footprint |
|---|---|---|---|---|
squeezenet1_1 | squeezenet1_1 (Torchvision) | Small | 1,245,506 | 4 MB |
squeezenet1_0 | squeezenet1_0 (Torchvision) | Small | 1,258,434 | 4 MB |
shufflenet_v2_x0_5 | shufflenet_v2_x0_5 (Torchvision) | Small | 1,376,802 | 5 MB |
mnasnet0_5 | mnasnet0_5 (Torchvision) | Small | 2,228,522 | 8 MB |
shufflenet_v2_x1_0 | shufflenet_v2_x1_0 (Torchvision) | Small | 2,288,614 | 8 MB |
mobilenet_v3_small | mobilenet_v3_small (Torchvision) | Small | 2,552,866 | 9 MB |
mnasnet0_75 | mnasnet0_75 (Torchvision) | Small | 3,180,218 | 12 MB |
shufflenet_v2_x1_5 | shufflenet_v2_x1_5 (Torchvision) | Small | 3,513,634 | 13 MB |
mobilenet_v2 | mobilenet_v2 (Torchvision) | Small | 3,514,882 | 13 MB |
regnet_y_400mf | regnet_y_400mf (Torchvision) | Small | 4,354,154 | 16 MB |
mnasnet1_0 | mnasnet1_0 (Torchvision) | Small | 4,393,322 | 16 MB |
efficientnet_b0 | efficientnet_b0 (Torchvision) | Small | 5,298,558 | 20 MB |
mobilenet_v3_large | mobilenet_v3_large (Torchvision) | Small | 5,493,042 | 21 MB |
regnet_x_400mf | regnet_x_400mf (Torchvision) | Small | 5,505,986 | 21 MB |
mnasnet1_3 | mnasnet1_3 (Torchvision) | Small | 6,292,266 | 24 MB |
regnet_y_800mf | regnet_y_800mf (Torchvision) | Small | 6,442,522 | 24 MB |
regnet_x_800mf | regnet_x_800mf (Torchvision) | Small | 7,269,666 | 27 MB |
shufflenet_v2_x2_0 | shufflenet_v2_x2_0 (Torchvision) | Small | 7,404,006 | 28 MB |
efficientnet_b1 | efficientnet_b1 (Torchvision) | Small | 7,804,194 | 30 MB |
densenet121 | densenet121 (Torchvision) | Small | 7,988,866 | 30 MB |
efficientnet_b2 | efficientnet_b2 (Torchvision) | Small | 9,120,004 | 35 MB |
regnet_x_1_6gf | regnet_x_1_6gf (Torchvision) | Small | 9,200,146 | 35 MB |
regnet_y_1_6gf | regnet_y_1_6gf (Torchvision) | Medium | 11,212,440 | 42 MB |
resnet18 | resnet18 (Torchvision) | Medium | 11,699,522 | 44 MB |
efficientnet_b3 | efficientnet_b3 (Torchvision) | Medium | 12,243,242 | 47 MB |
googlenet | googlenet (Torchvision) | Medium | 13,014,898 | 49 MB |
densenet169 | densenet169 (Torchvision) | Medium | 14,159,490 | 54 MB |
regnet_x_3_2gf | regnet_x_3_2gf (Torchvision) | Medium | 15,306,562 | 58 MB |
efficientnet_b4 | efficientnet_b4 (Torchvision) | Medium | 19,351,626 | 74 MB |
regnet_y_3_2gf | regnet_y_3_2gf (Torchvision) | Medium | 19,446,348 | 74 MB |
densenet201 | densenet201 (Torchvision) | Medium | 20,023,938 | 77 MB |
resnet34 | resnet34 (Torchvision) | Medium | 21,807,682 | 83 MB |
resnext50_32x4d | resnext50_32x4d (Torchvision) | Medium | 25,038,914 | 95 MB |
resnet50 | resnet50 (Torchvision) | Medium | 25,567,042 | 97 MB |
inception_v3 | inception_v3 (Torchvision) | Medium | 27,171,274 | 103 MB |
swin_t | swin_t (Torchvision) | Medium | 28,298,364 | 108 MB |
convnext_tiny | convnext_tiny (Torchvision) | Medium | 28,599,138 | 109 MB |
densenet161 | densenet161 (Torchvision) | Medium | 28,691,010 | 110 MB |
efficientnet_b5 | efficientnet_b5 (Torchvision) | Large | 30,399,794 | 116 MB |
regnet_y_8gf | regnet_y_8gf (Torchvision) | Large | 39,391,482 | 150 MB |
regnet_x_8gf | regnet_x_8gf (Torchvision) | Large | 39,582,658 | 151 MB |
efficientnet_b6 | efficientnet_b6 (Torchvision) | Large | 43,050,714 | 165 MB |
resnet101 | resnet101 (Torchvision) | Large | 44,559,170 | 170 MB |
swin_s | swin_s (Torchvision) | Large | 49,616,268 | 189 MB |
convnext_small | convnext_small (Torchvision) | Large | 50,233,698 | 191 MB |
regnet_x_16gf | regnet_x_16gf (Torchvision) | Large | 54,288,546 | 207 MB |
resnet152 | resnet152 (Torchvision) | Large | 60,202,818 | 230 MB |
alexnet | alexnet (Torchvision) | Large | 61,110,850 | 233 MB |
efficientnet_b7 | efficientnet_b7 (Torchvision) | Large | 66,357,970 | 254 MB |
wide_resnet50_2 | wide_resnet50_2 (Torchvision) | Large | 68,893,250 | 263 MB |
resnext101_64x4d | resnext101_64x4d (Torchvision) | Large | 83,465,282 | 319 MB |
regnet_y_16gf | regnet_y_16gf (Torchvision) | Large | 83,600,150 | 319 MB |
vit_b_16 | vit_b_16 (Torchvision) | Large | 86,577,666 | 330 MB |
swin_b | swin_b (Torchvision) | Large | 87,778,234 | 335 MB |
vit_b_32 | vit_b_32 (Torchvision) | Large | 88,234,242 | 336 MB |
convnext_base | convnext_base (Torchvision) | Large | 88,601,474 | 337 MB |
resnext101_32x8d | resnext101_32x8d (Torchvision) | Large | 88,801,346 | 339 MB |
regnet_x_32gf | regnet_x_32gf (Torchvision) | Large | 107,821,570 | 411 MB |
wide_resnet101_2 | wide_resnet101_2 (Torchvision) | Large | 126,896,706 | 484 MB |
vgg11 | vgg11 (Torchvision) | Large | 132,873,346 | 506 MB |
vgg11_bn | vgg11_bn (Torchvision) | Large | 132,878,850 | 506 MB |
vgg13 | vgg13 (Torchvision) | Large | 133,057,858 | 507 MB |
vgg13_bn | vgg13_bn (Torchvision) | Large | 133,063,746 | 507 MB |
vgg16 | vgg16 (Torchvision) | Large | 138,367,554 | 527 MB |
vgg16_bn | vgg16_bn (Torchvision) | Large | 138,376,002 | 527 MB |
vgg19 | vgg19 (Torchvision) | Large | 143,677,250 | 548 MB |
vgg19_bn | vgg19_bn (Torchvision) | Large | 143,688,258 | 548 MB |
regnet_y_32gf | regnet_y_32gf (Torchvision) | Large | 145,056,780 | 553 MB |
convnext_large | convnext_large (Torchvision) | Large | 197,777,346 | 754 MB |
vit_l_16 | vit_l_16 (Torchvision) | Large | 304,336,642 | 1,160 MB |
vit_l_32 | vit_l_32 (Torchvision) | Large | 306,545,410 | 1,169 MB |
vit_h_14 | vit_h_14 (Torchvision) | Large | 632,055,810 | 2,411 MB |
regnet_y_128gf | regnet_y_128gf (Torchvision) | Large | 644,822,904 | 2,461 MB |
| Model Name | Architecture | Size | Number of Trainable Parameters | Memory Footprint |
|---|---|---|---|---|
YOLOv8_nano | YOLOv8 - Nano | Small | 3,012,782 | 11 MB |
YOLOv8_small | YOLOv8 - Small | Medium | 11,139,454 | 42 MB |
FasterRCNNMobileNetV3SmallFPN | Faster R-CNN with mobilenet_v3_small backbone | Medium | 16,823,453 | 64 MB |
FasterRCNNMobileNetV3LargeFPN | Faster R-CNN with mobilenet_v3_large backbone | Medium | 18,970,397 | 72 MB |
FasterRCNNMobileNetV3Large320FPN | Faster R-CNN with mobilenet_v3_large backbone | Medium | 18,970,397 | 72 MB |
FCOSResnet18FPN | Fully Convolutional One Stage (FCOS) with resnet18 backbone | Medium | 19,106,767 | 72 MB |
RetinaNetResnet18FPN | RetinaNet with resnet18 backbone | Medium | 19,358,526 | 73 MB |
YOLOv8_medium | YOLOv8 - Medium | Medium | 25,862,094 | 98 MB |
FasterRCNNResnet18FPN | Faster R-CNN with resnet18 backbone | Medium | 28,314,881 | 108 MB |
FCOSResnet34FPN | Fully Convolutional One Stage (FCOS) with resnet34 backbone | Medium | 29,207,503 | 111 MB |
RetinaNetResnet34FPN | RetinaNet with resnet34 backbone | Medium | 29,459,262 | 112 MB |
FCOSResnet50FPN | Fully Convolutional One Stage (FCOS) with resnet50 backbone | Large | 32,082,895 | 122 MB |
RetinaNetResnet50FPN | RetinaNet with resnet50 backbone | Large | 32,334,654 | 123 MB |
FasterRCNNResnet34FPN | Faster R-CNN with resnet34 backbone | Large | 38,415,617 | 146 MB |
FasterRCNNResnet50FPN | Faster R-CNN with resnet50 backbone | Large | 41,340,161 | 158 MB |
YOLOv8_large | YOLOv8 - Large | Large | 43,637,534 | 166 MB |
FCOSResnet101FPN | Fully Convolutional One Stage (FCOS) with resnet101 backbone | Large | 51,022,799 | 195 MB |
RetinaNetResnet101FPN | RetinaNet with resnet101 backbone | Large | 51,274,558 | 196 MB |
FasterRCNNResnet101FPN | Faster R-CNN with resnet101 backbone | Large | 60,280,065 | 230 MB |
YOLOv8_xl | YOLOv8 - Extra large | Large | 68,162,222 | 260 MB |
| Model Name | Architecture | Size | Number of Trainable Parameters | Memory Footprint |
|---|---|---|---|---|
lraspp_mobilenet_v3_large | lraspp_mobilenet_v3_large (Torchvision) | Small | 3,219,668 | 12 MB |
deeplabv3_mobilenet_v3_large | deeplabv3_mobilenet_v3_large (Torchvision) | Medium | 11,022,650 | 42 MB |
fcn_resnet50 | fcn_resnet50 (Torchvision) | Large | 32,951,370 | 125 MB |
deeplabv3_resnet50 | deeplabv3_resnet50 (Torchvision) | Large | 39,636,042 | 151 MB |
fcn_resnet101 | fcn_resnet101 (Torchvision) | Large | 51,943,498 | 198 MB |
deeplabv3_resnet101 | deeplabv3_resnet101 (Torchvision) | Large | 58,628,170 | 224 MB |