Workspaces
Introduction
The Chariot Workspaces service provides an on-platform integrated development environment for developers and data scientists. The following environments are available:
-
JupyterLab
-
VS Code
-
RStudio
There are two concepts that this service introduces: Workspaces and applications.
A Workspace can be thought of as a volume where your data persists. After that volume has been created, you are able to run an application—like JupyterLab, VS Code, or RStudio—on top of that Workspace.
Only the data stored in /home/jovyan of your application will be persisted in your Workspace.
If you would like to select a different application to use with your Workspace, you can shut down your application and create a new one with the application of your choice. All of your data from your previous application will remain in your Workspace, located under /home/jovyan.
Workspaces in Chariot
Creating a Workspace
Inside of a project, navigate to the Workspaces section of the navigation bar. A list of existing Workspaces will be provided, along with the capacity, status, and available actions for each Workspace.
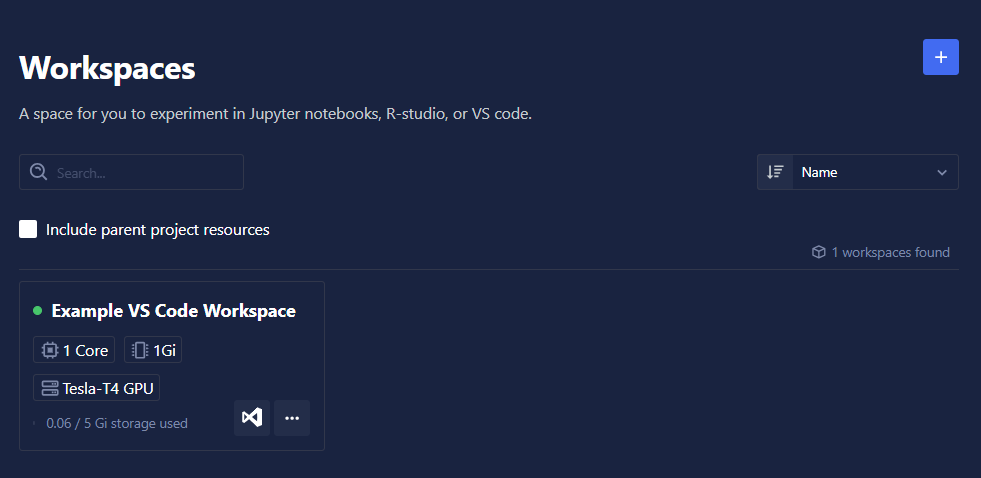
To create a new Workspace, click the + button in the top-right corner.
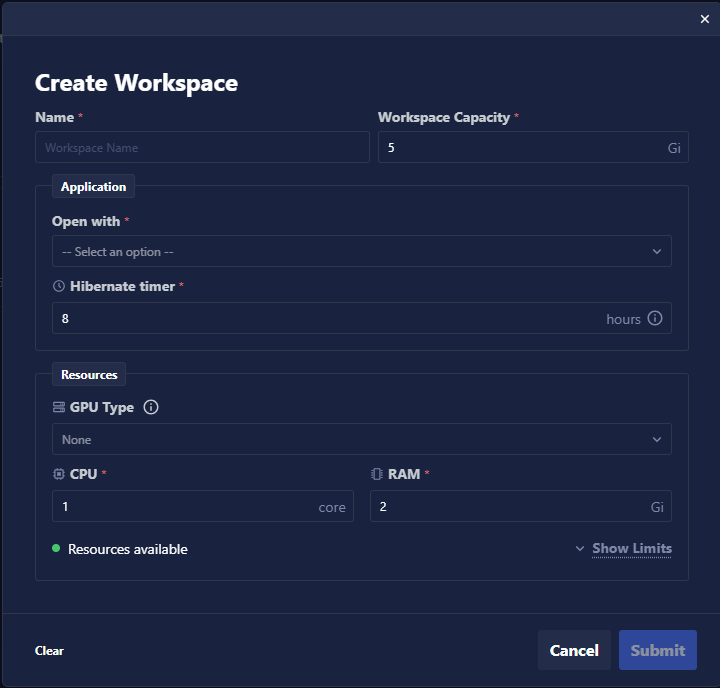
When prompted, provide the following application and resource information for your Workspace:
- Application
- Open with: From the drop-down menu, select which application (RStudio, Jupyter Notebook, or VS Code) to utilize for your Workspace.
- Hibernation timer: Set a value for the hibernation timer. After the set period of inactivity (measured by network traffic), the application will scale down, better utilizing resources and keeping costs scalable. If the value is 0, the application will never hibernate.
- Resources
- GPU type: If accelerated computing is needed, select the GPU resource type to utilize for this Workspace; otherwise, this can be left empty.
- CPU: Choose how many CPU cores to allocate to this Workspace application.
- RAM: Choose how many gigs of RAM to allocate to this Workspace application.
Workspace storage capacity can be expanded after it has been created—but only if the application is not currently active. Workspace storage capacity cannot, however, be decreased once set, so be sure to note the minimum storage capacity that you require.
Starting an Application
Once the application information has been submitted, the application startup process will run, providing you with a status bar to view its progress. Once that process is complete, the chosen application—whether RStudio, Jupyter Notebook, or VS Code—will open automatically.
Stopping an Application
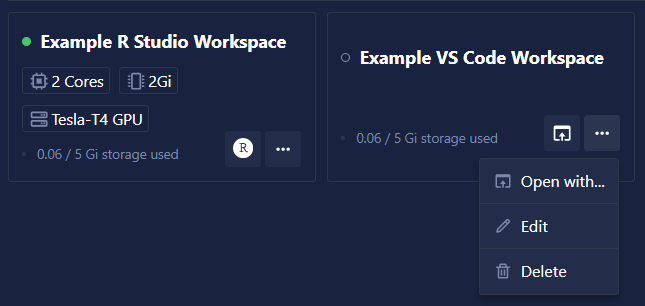
When you are finished using an application, be sure to save any of the files that you have been working on. You can then navigate to the Workspaces page and click the … button, followed by the Stop Session button, to shut down that session and free up the computing resources for further work. Data from your stopped sessions will be preserved in your Workspace for later use.
Editing a Workspace
If you would like to edit information about your Workspace—including its name or to increase the storage capacity—click the … button for the Workspace you want to edit, followed by the Edit button.
Keep in mind that Workspaces can only be edited if they are not currently active.
Once you have edited your Workspace information, click the Submit button to save any changes.
Deleting a Workspace
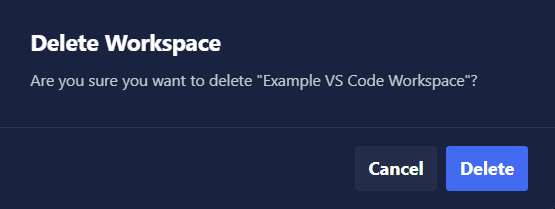
If you are no longer using the data in a Workspace and would like to delete it, click the Delete button next to the Workspace that you would like to remove. To prevent unintended data deletion, you will be given a confirmation prompt to confirm the action.
Setting Up Your Development Environment
Chariot includes Armory, a read-only pypi and npm registry that includes a selection of packages for prototyping Chariot-powered, machine learning-enabled applications directly from Workspaces. Armory also includes Striveworks resources such as the Python SDK, so even if you have access to the internet, it may be good practice to set Armory as a secondary index.
Instructions for setting up Python and NPM CLIs via Armory can be found . You must be logged into the Chariot platform in order to access the Armory. Once your CLIs have been configured to point to Chariot's internal registries, they can be used normally.
Armory is not a full mirror of the default pypi and NPM registries. Use comprehensive registries as primary sources when available.
Version Control Best Practices in Workspaces
Version control is essential for collaborative and organized development. Chariot Workspaces fully support using git for version control, allowing you to clone, pull, and push repositories as you would in any standard development environment.
Using Git With SSH Keys
To securely interact with remote git repositories (such as GitHub, GitLab, or Bitbucket), it is recommended to use SSH keys for authentication. However, because multiple users may have access to the same Workspace, it is important to protect your SSH credentials from unauthorized use.
Best Practice:
- Always generate SSH keys with a passphrase. This ensures that even if another user gains access to your private key file within the Workspace, they cannot use it to impersonate you or access your repositories without knowing your passphrase.
- When prompted during
ssh-keygen, enter a strong passphrase. You will need to enter this passphrase when using your SSH key for git operations. - For more information, see the GitHub documentation on SSH key passphrases.
Example:
ssh-keygen -t ed25519 -C "your_email@example.com"
# When prompted, enter a secure passphrase
- Add your public key to your git hosting provider (e.g., GitHub, GitLab).
- Store your private key in your home directory (e.g.,
/home/jovyan/.ssh/id_ed25519).
- Never share your private key or your passphrase with others.
- If you are working in a shared Workspace, always lock your SSH key with a passphrase to prevent accidental or malicious use by other users.
By following these best practices, you can safely use git for version control in Chariot Workspaces while protecting your identity and code repositories.
Prototyping Applications
VS Code in Chariot Workspaces supports automatic port forwarding and proxying, allowing you to prototype and test front-end web applications and web-based APIs. This works for any port binding, and multiple apps and ports can be active at the same time, enabling full-stack application development in a single Workspace.
The /proxy/<port>/ pattern is only supported in VS Code Workspaces. JupyterLab and RStudio do not support this proxying method. Be sure you are running a VS Code Workspace to use this feature.
General Steps for Accessing Development Servers
-
Given a VS Code application running at the example URL below:
https://%%CHARIOT-HOST%%/portalvsc/<your-notebook-url>/
Start your development server on port 8000.
-
You can now access your development server by going to the following URL:
https://%%CHARIOT-HOST%%/portalvsc/<your-notebook-url>/proxy/8000/
noteThe trailing slash after the port indicates the root of your running application. Forgetting the slash will cause unexpected behavior.
Development Examples
- Streamlit
- FastAPI
- NextJS
Developing a Streamlit Application
-
If you are operating in an air-gapped environment, then you will need to configure your
pip.confto contain PyPI repositories that are accessible within your environment.Since the
pip.confconfiguration file varies by environment, the Striveworks team is available to assist you in configuring it for your current setting. -
Create a project and environment:
mkdir example_streamlit_app && \cd example_streamlit_appCreate a virtual environment:
python3 -m venv venv/Alternatively, you can use a dependency management tool such as Poetry or uv if you prefer.
-
Activate a virtual environment and install Streamlit:
source venv/bin/activate && \pip install streamlit -
Create a Streamlit application:
app.py
import streamlit as stif __name__ == "__main__":st.set_page_config(layout="wide")st.title("Hello World")st.text("This is a Streamlit application.") -
Configure and run a Streamlit application:
# Ex: production.chariot.striveworks.usCHARIOT_HOST="FILL_IN_CHARIOT_HOST" && \export STREAMLIT_SERVER_PORT=8000 && \export STREAMLIT_BROWSER_SERVER_ADDRESS="${CHARIOT_HOST}" && \streamlit run app.pyIn this command, we need to fill in the
CHARIOT_HOSTvariable to prevent Cross-Origin Resource Sharing (CORS) issues.We set
STREAMLIT_SERVER_PORT=8000so that the Streamlit server runs on port 8000 since Workspaces only looks for development servers running on this port. -
Access your Streamlit application.
After running your Streamlit application, Streamlit will provide a message similar to this one:
You can now view your Streamlit app in your browser.

URL: http://%%CHARIOT-HOST%%:8000
This URL is not correct, and you can ignore it.
Instead, you can access the Streamlit application by taking the URL you are using to access your Workspace's application and adding
/proxy/8000/to the end of the URL.For example, if
https://%%CHARIOT-HOST%%/portalvsc/<your-notebook-url>/is the URL of your VS Code Integrated Development Environment, thenhttps://%%CHARIOT-HOST%%/portalvsc/<your-notebook-url>/proxy/8000/would be the URL to your Streamlit application.
Developing a FastAPI Application
-
If you are operating in an air-gapped environment, then you will need to configure your
pip.confto contain PyPI repositories that are accessible within your environment.Since the
pip.confconfiguration file varies by environment, the Striveworks team is available to assist you in configuring it for your current setting. -
Create a project and environment:
mkdir example_fastapi_app && \cd example_fastapi_appCreate a virtual environment:
python3 -m venv venv/Alternatively, you can use a dependency management tool such as Poetry or uv if you prefer.
-
Activate a virtual environment and install FastAPI and its dependencies:
source venv/bin/activate && \pip install fastapi "uvicorn[standard]" jinja2 -
Create a FastAPI application:
templates/item.html<html><head><title>Item Details</title></head><body><h1>Item ID: {{ id }}</h1></body></html>main.pyfrom fastapi import FastAPI, Requestfrom fastapi.responses import HTMLResponsefrom fastapi.staticfiles import StaticFilesfrom fastapi.templating import Jinja2Templatesapp = FastAPI()templates = Jinja2Templates(directory="templates")@app.get("/items/{id}", response_class=HTMLResponse)async def read_item(request: Request, id: str):return templates.TemplateResponse("item.html", {"request": request, "id": id}) -
Run your FastAPI application:
uvicorn main:app --host 0.0.0.0 --port 8000 --reload -
Access your FastAPI application:
After running your application, you can access the development server with the same method described earlier.
If
https://%%CHARIOT-HOST%%/portalvsc/<your-notebook-url>/is the URL of your VS Code Integrated Development Environment, thenhttps://%%CHARIOT-HOST%%/portalvsc/<your-notebook-url>/proxy/8000/would be the URL to your application.You can make a query to your FastAPI endpoint at
https://%%CHARIOT-HOST%%/portalvsc/<your-notebook-url>/proxy/8000/items/hello-world.
Developing a NextJS Application
-
If you are operating in an air-gapped environment, you will need to configure your Node Package Manager to pull down packages from a registry that is available in your environment.
There are multiple ways you can configure pulling packages from a separate registry:
-
You can specify which registries to use with the --registry flag on each command:
npm install --registry=https://some.registry.url -
You can create a
.NPMRCfile with the contents below:registry=<https://some.registry.url>@namespace:registry=<https://some.other.registry.url>If you place this file in your project, your project will by default pull from that registry. If you place this file in your system user folder, all projects will by default pull from the specified registry.
-
-
Create a project and install dependencies:
mkdir example_nextjs_app && \cd example_nextjs_appnpm init && \npm install next react react-dom -
Create a Next.js application:
Make a pages directory within your example application:
mkdir pagesCreate a file within the pages directory:
pages/index.jsfunction Home() {return <div>Welcome to Next.js!</div>}export default HomeUpdate the
scriptssection of thepackage.jsonto contain:"scripts": {"test": "echo \"Error: no test specified\" && exit 1","dev": "next -p 8000","build": "next build","start": "next start -p 8000"} -
Configuring your
next.config.js:You will need to create a
next.config.jsfile if one does not already exist. In this file, you will need to add the code below.const nextConfig = {assetPrefix: '/portalvsc/<your-notebook-url>/proxy/8000/', // Add the route to your application here}module.exports = nextConfig -
Run your Next.js application:
npm run dev -
Access your Next.js application:
After running your application, you can access the development server with the same method described earlier.
If
https://%%CHARIOT-HOST%%/portalvsc/<your-notebook-url>/is the URL of your VS Code Integrated Development Environment, thenhttps://%%CHARIOT-HOST%%/portalvsc/<your-notebook-url>/proxy/8000/would be the URL to your Next.js application.