Data Augmentations
Within Chariot's training runs, you can apply augmentations, including color transformations, to your data. This section of documentation details how to apply these augmentations (also known as transforms) to your training data.
Applying Data Augmentations
Navigate to the Training Run wizard and toggle Apply Data Augmentations. This generates the list of transforms below. Toggle off any transforms you don't need to use.
-
HorizontalShear -
VerticalShear -
Identity(this transform has no effect) -
Rotation -
TranslateX(also known as horizontal translation) -
TranslateY(also known as vertical translation)
Next, toggle Use Color Transformations. This generates the list of transforms below. Toggle off any transforms you don't need to use.
-
AutoContrast(unaffected by Transform Strength setting) -
Brightness -
Color -
Contrast -
Equalize(unaffected by Transform Strength setting) -
Posterize -
Sharpness -
Solarize -
Invert(unaffected by Transform Strength setting)
In most cases, most (if not all) transforms should be used. Know your data well enough to understand whether any of these transforms will break your data.
Using RandAugment
RandAugment selects a random set of transforms from the lists above for each image in each training data batch. When using RandAugment, you can set the number of transforms that RandAugment will choose and the strength of how much each transform can perturb the image.
RandAugment selects a random amount of perturbation from the set range for that given transform and iteratively transforms the image. For example, when using the Brightness transform, if the Transform Strength is set to 4, the original image will be transformed to some result within your selected brightness range up to Strength 4. See Figure 1.
Using a Custom Training Config
Chariot supports custom training configs but they are not recommended. The first step is to get a working training run config to edit. The easiest way to do this is to start a run and copy/paste that run's config into your favorite editor.
Once done, locate the transforms block in the config that contains RandAugment (your editor's find functionality should help here), which will look very similar to the block below.
    "transform": {
        "transforms": [
          {
            "m": 3,
            "n": 3,
            "#class_name": "RandAugment"
          },
          {
            "max_size": 1333,
            "min_size": 800,
            "#class_name": "Resize"
          }
        ],
        "#class_name": "Compose"
    },
In this example, the transforms block ends with "#class_name": "RandAugment," indicating that we default to using all the transforms. The names of these transforms are all listed at the top (including both the Color Transforms and the Other Transforms).
You have two options: You can specify which transforms to exclude, or you can specify the exact list of transforms you want to use—in which case, whatever you specify supersedes the default list of all transforms.
Use the following pattern to specify one (or more) transforms to exclude. In the example, we exclude Solarize and Posterize.
    "transform": {
        "transforms": [
          {
            "m": 3,
            "n": 3,
            "#class_name": "RandAugment",
            "augs_to_remove": [
                "Solarize",
                "Posterize"
            ]
          },
          {
            "max_size": 1333,
            "min_size": 800,
            "#class_name": "Resize"
          }
        ],
        "#class_name": "Compose"
    },
Alternatively, using the following pattern, you can specify precisely which transforms to include:
    "transform": {
        "transforms": [
          {
            "m": 3,
            "n": 3,
            "#class_name": "RandAugment",
            "augs_to_use": [
                "Brightness",
                "Color",
                "Rotation",
                "HorizontalShear",
                "VerticalShear"
            ]
          },
          {
            "max_size": 1333,
            "min_size": 800,
            "#class_name": "Resize"
          }
        ],
        "#class_name": "Compose"
    },
In the above, n is the number of transforms to use, and m is the (maximum) strength of the transforms to be applied.
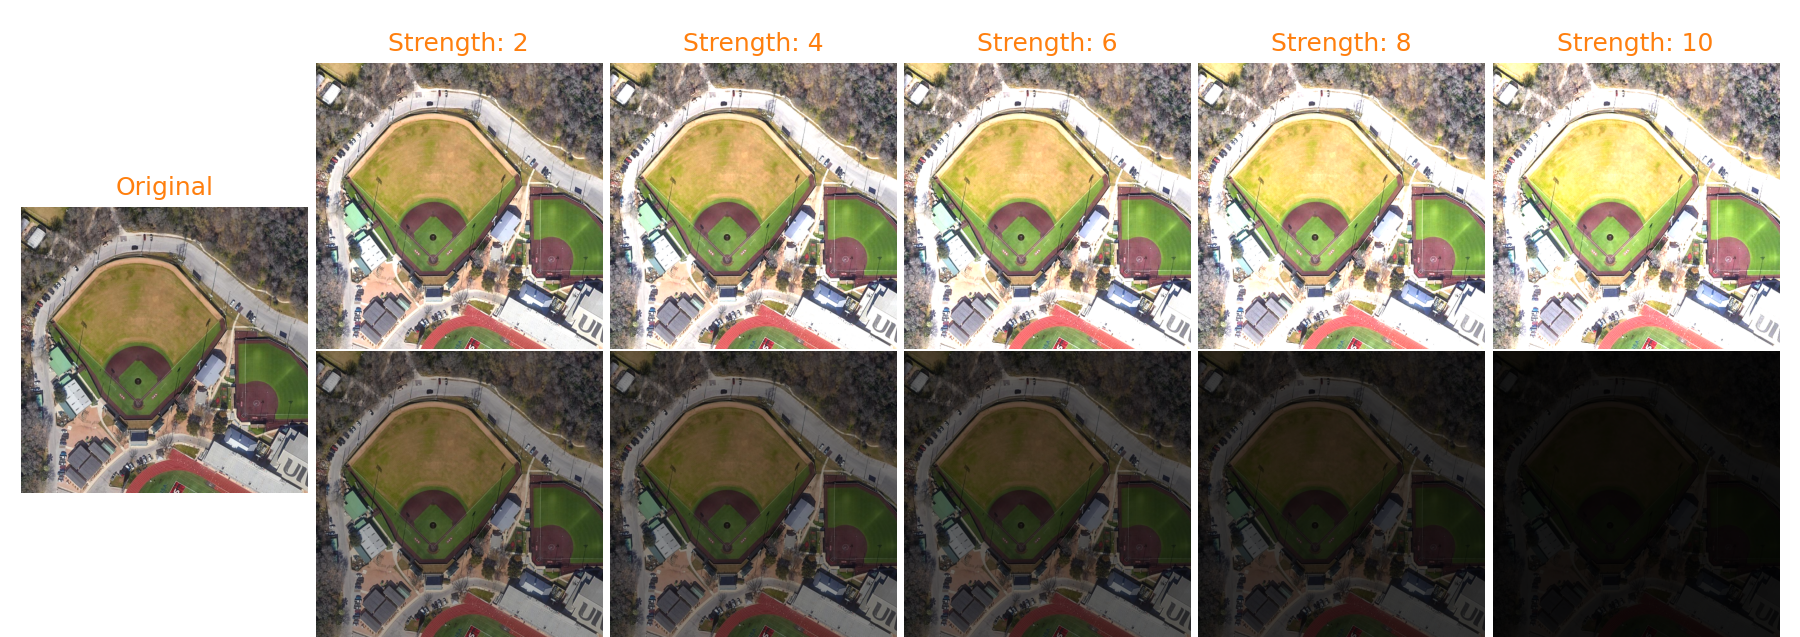
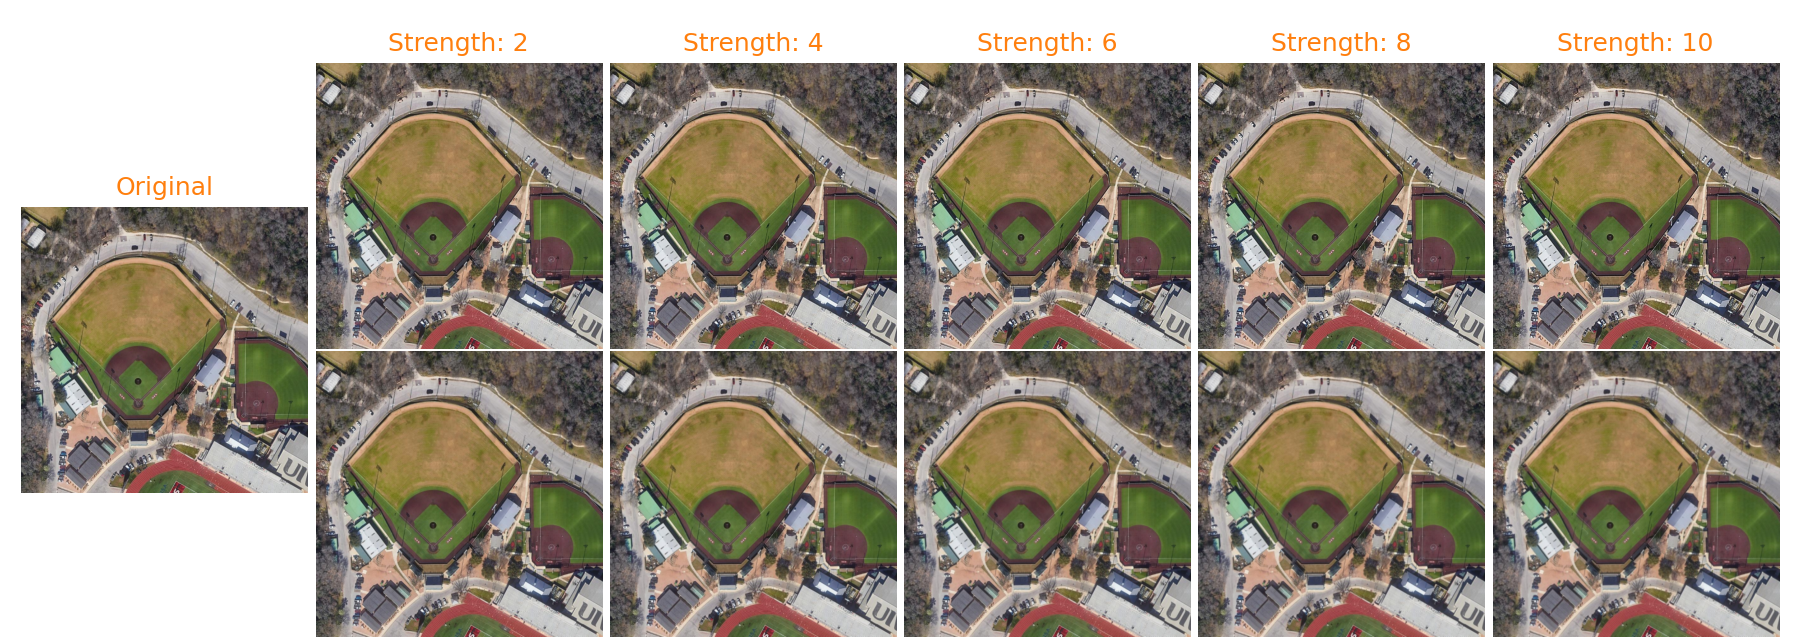
Brightness
The Brightness transform randomly adjusts the brightness of an input image. For each strength, the result is somewhere between the top and bottom image, with the average result being the original image.
Figure 1: Impact of brightness adjustments to an example image
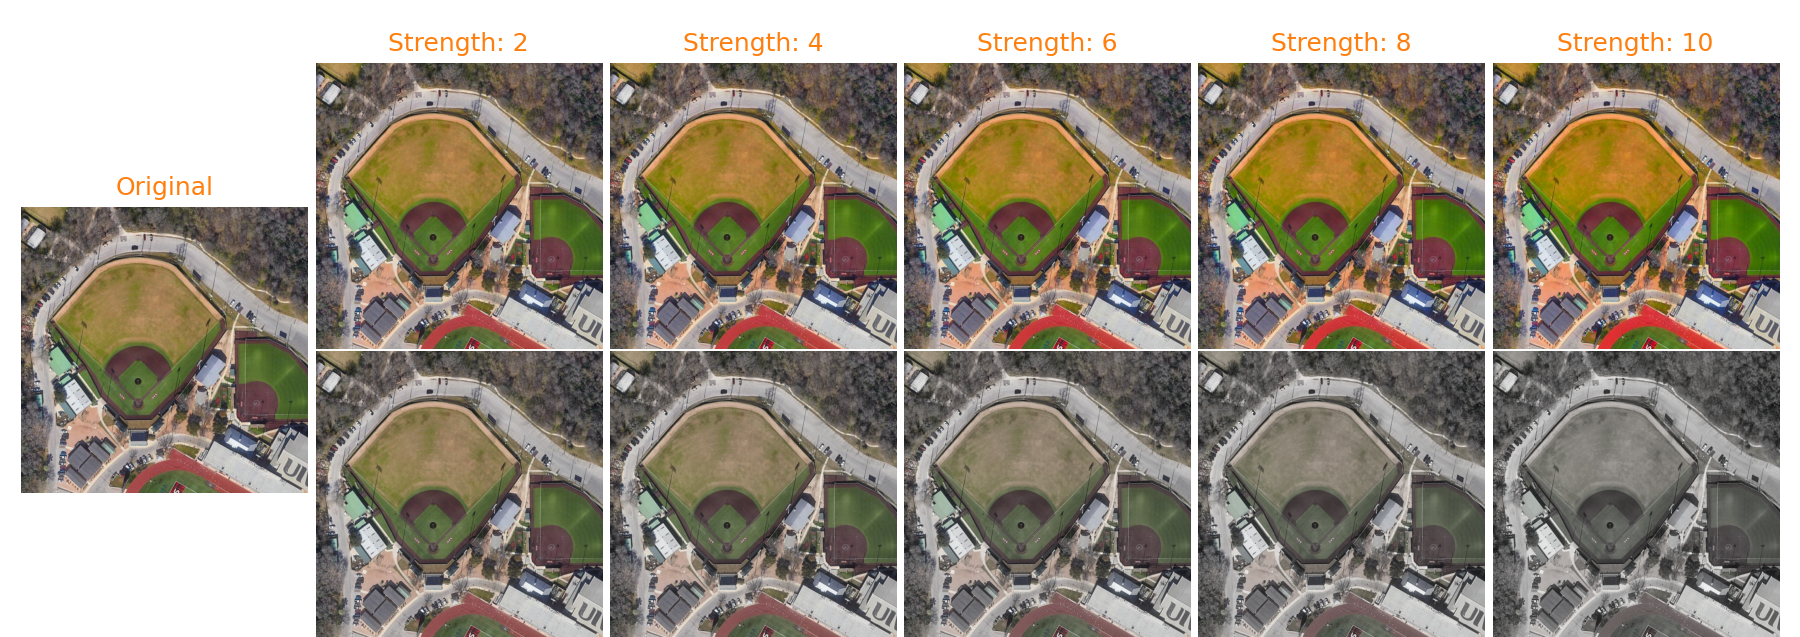
Color
The Color transform impacts the vividness of the colors in the image. When the random value is larger, the colors become more distinct, and the image becomes grayer (less distinct) when the values are smaller. The transformed image falls somewhere (randomly) between the top and bottom image (for each strength), with the average result being the original image.
Figure 2: Impact of color-level adjustments on an example image
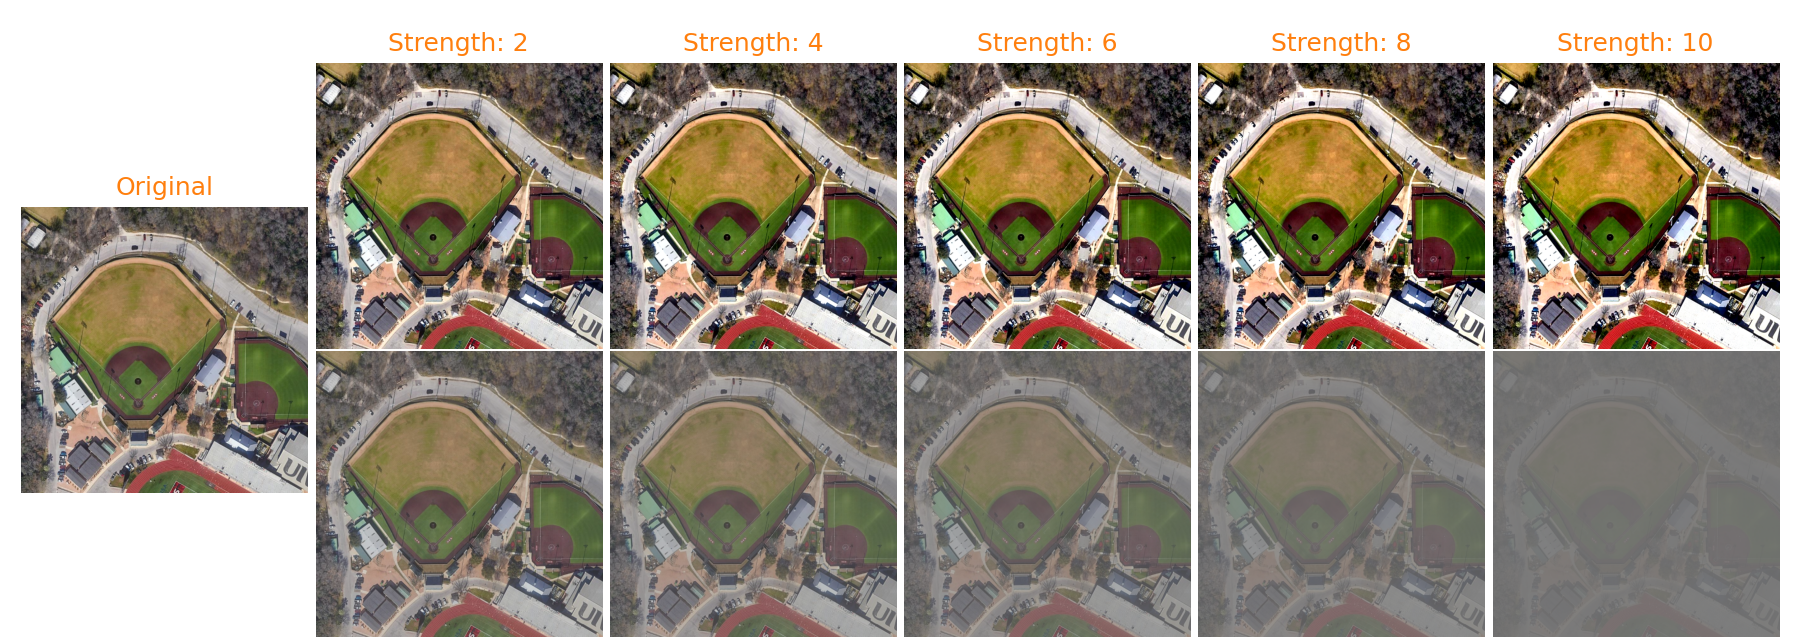
Contrast
The Contrast transform randomly alters an image's contrast. Transformed images fall somewhere (randomly) between the top and bottom image (for each strength), with the average result being the original image.
Figure 3: Impact of contrast adjustments on an example image
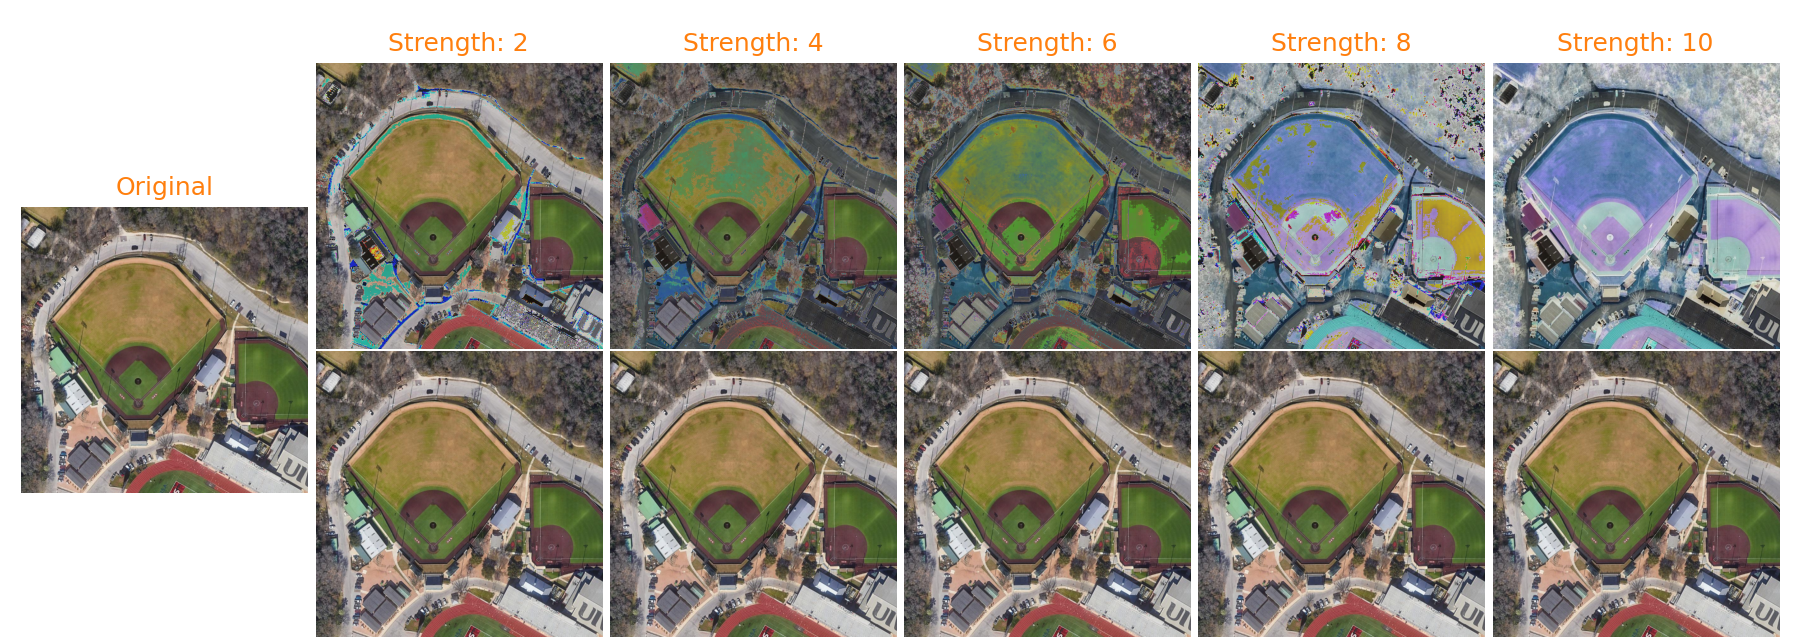
Posterize
The Posterize transform reduces the number of possible colors in the image by zeroing out the least significant bits in each color channel; the more bits that are zeroed, the larger the impact on the image.
At native bit depth, most commercial imagery has an 8-bit color depth (per color channel). Up to and including Strength 2, posterization has no impact on the image. At Strength 4, the least significant bit is removed from every pixel—and the result is that half as many colors are available (down to 128 colors per channel from 256). In this case, zeroing out the least significant bit has the effect of rounding down every odd-numbered color to the next smaller even-numbered color. At Strength 6, the two smallest bits are zeroed, which means rounding down to the nearest smaller multiple of 4 (again, halving the number of colors available). At Strength 8, the three smallest bits are zeroed; at strength 10, the four smallest bits are zeroed.
While the differences appear subtle in this image, machine learning models very easily perceive the differences, and this transform can sometimes have a large impact on a model. While it is recommended to include this transform, posterization tends to have a net-negative impact on results in some experiments.
Figure 4: Impact of posterization adjustments to an example image

Sharpness
The Sharpness transform randomly alters an image's sharpness. Transformed images fall somewhere (randomly) between the top and bottom image (for each strength), with the average result being the original image.
Figure 5: Impact of sharpness adjustments to an example image; the impact shown here is small presumably because the image was sharpened in preprocessing
Solarize and Invert
The Solarize transform inverts pixels whose values are above a threshold. Specifically, for 8-bit imagery whose maximum pixel value is 255, a color of n becomes 255-n if n is larger than the threshold. The strength of this transform reduces the threshold for inversion so that at higher strengths, more pixels are inverted.
For every input image, a random threshold is set between 256—resulting in no change—and the minimum threshold determined by the strength. While it is recommended to include this transform in some experiments, solarization tends to have a net-negative impact on results.
The Invert transform is a special case of solarize, where the threshold is 0; in other words, every pixel is inverted, regardless of its value.
Figure 6: Impact of solarization adjustments to an example image
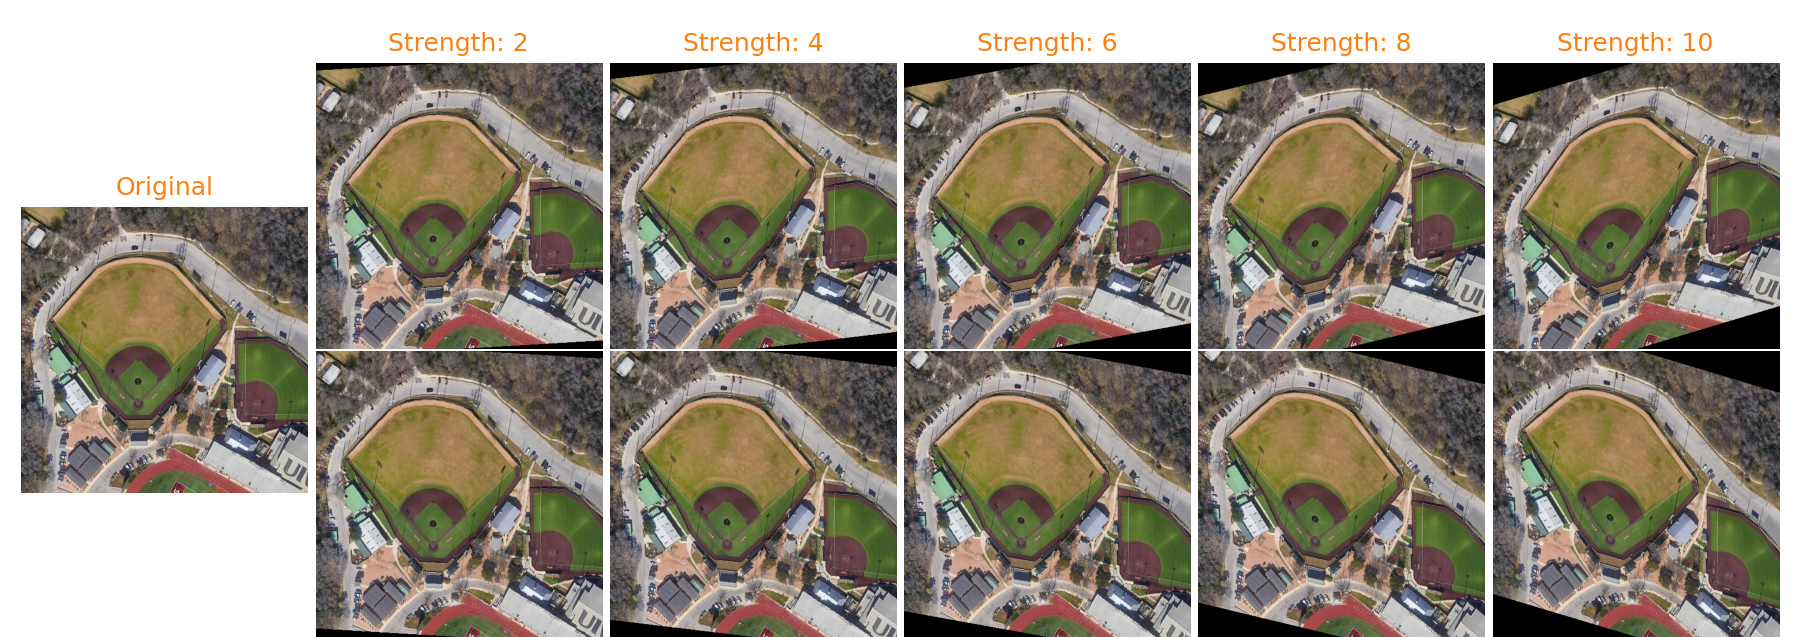
Horizontal Shear
The Horizontal Shear transform artificially alters the perspective of the image. The amount of shear applied for each image (each time seen) varies between the top and bottom images, and the average output image is the input image.
Figure 7: Impact of horizontal shear adjustments to an example image
Vertical Shear
The Vertical Shear transform is similar to horizontal shear, except the shearing references the other axis of the image.
Figure 8: Impact of vertical shear adjustments to an example image
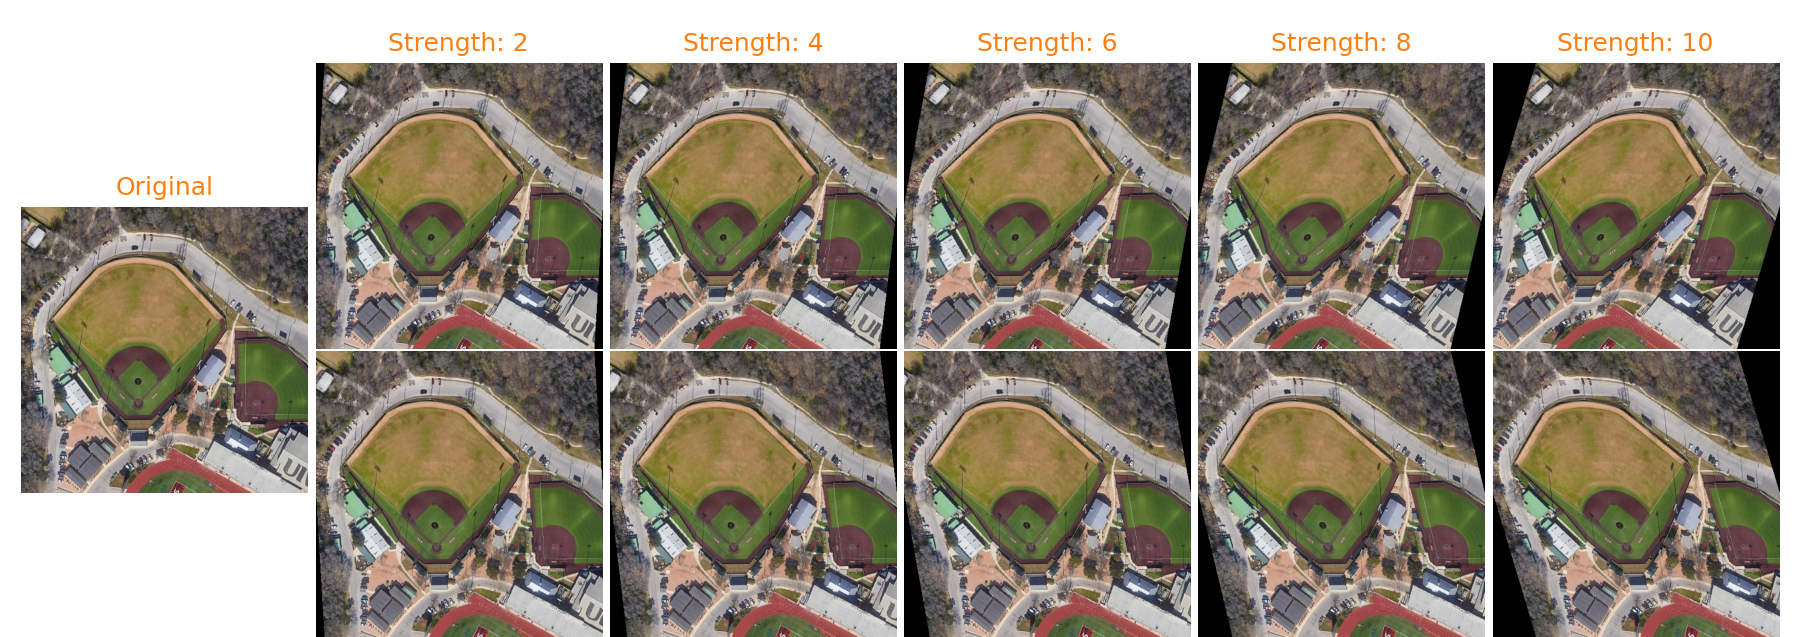
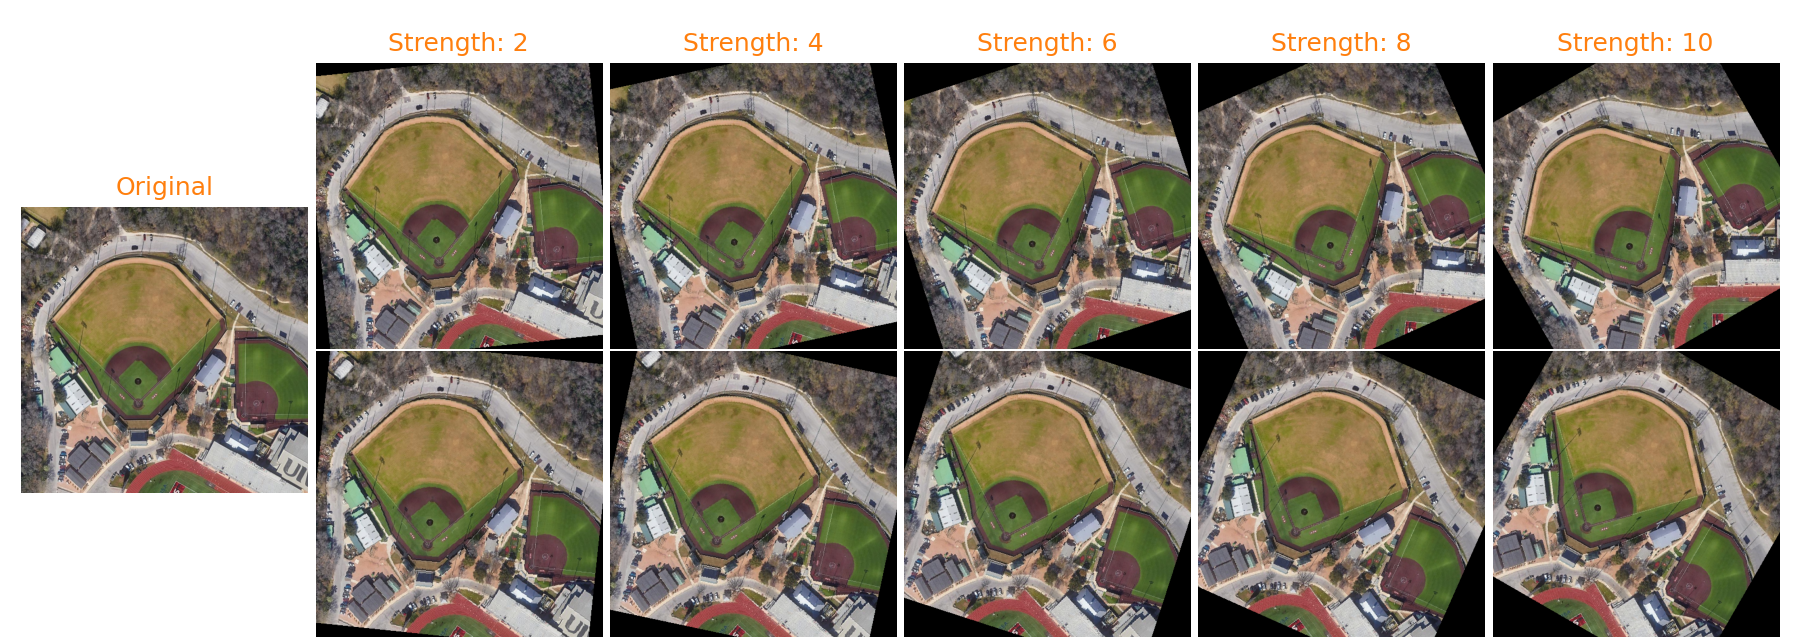
Rotation
The Rotation transform randomly rotates the image, either left or right—clockwise or counterclockwise—by a random number of degrees chosen at each application. For overhead imagery, the rotation shouldn't negatively impact a model, but it may be for on-the-ground imagery.
Figure 9: Impact of rotation adjustments to an example image
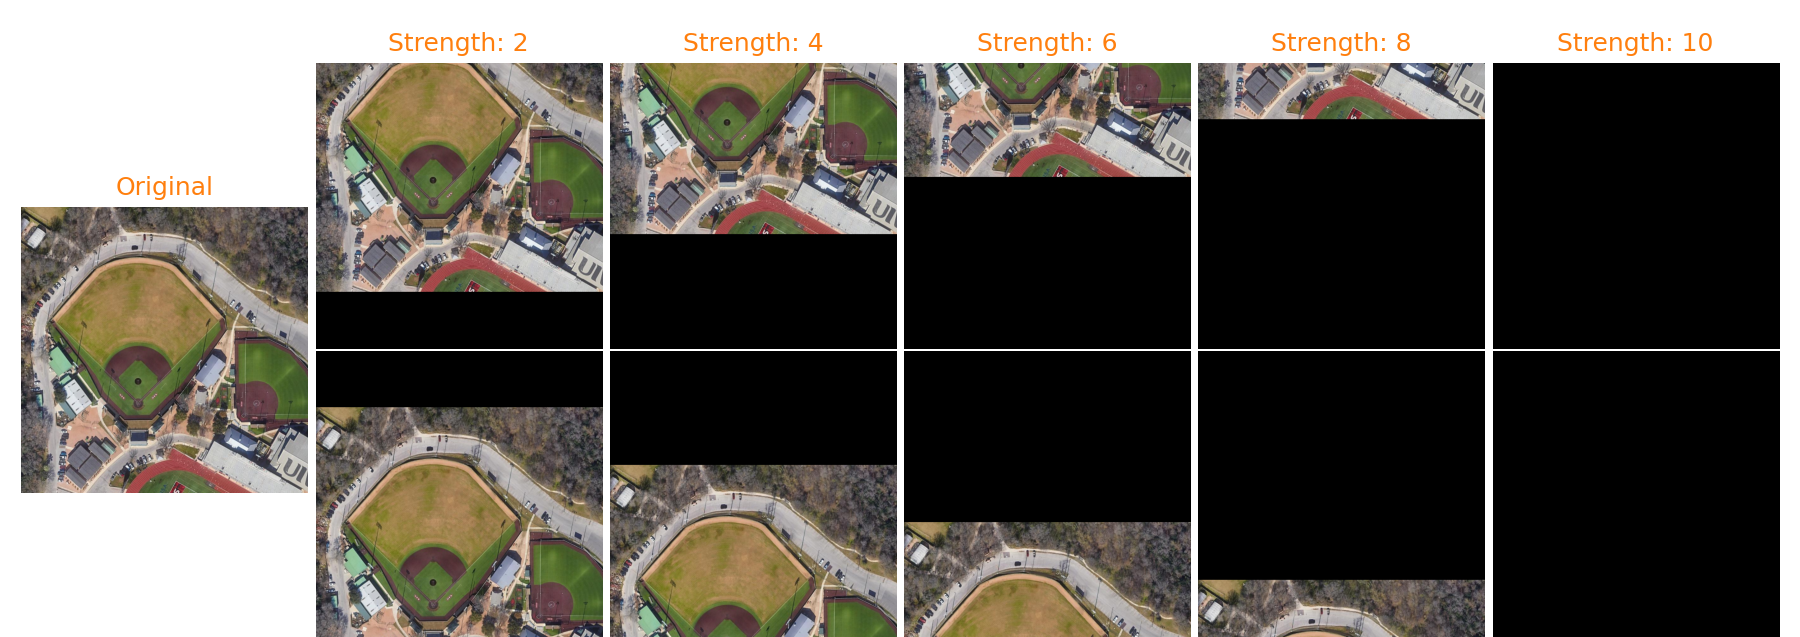
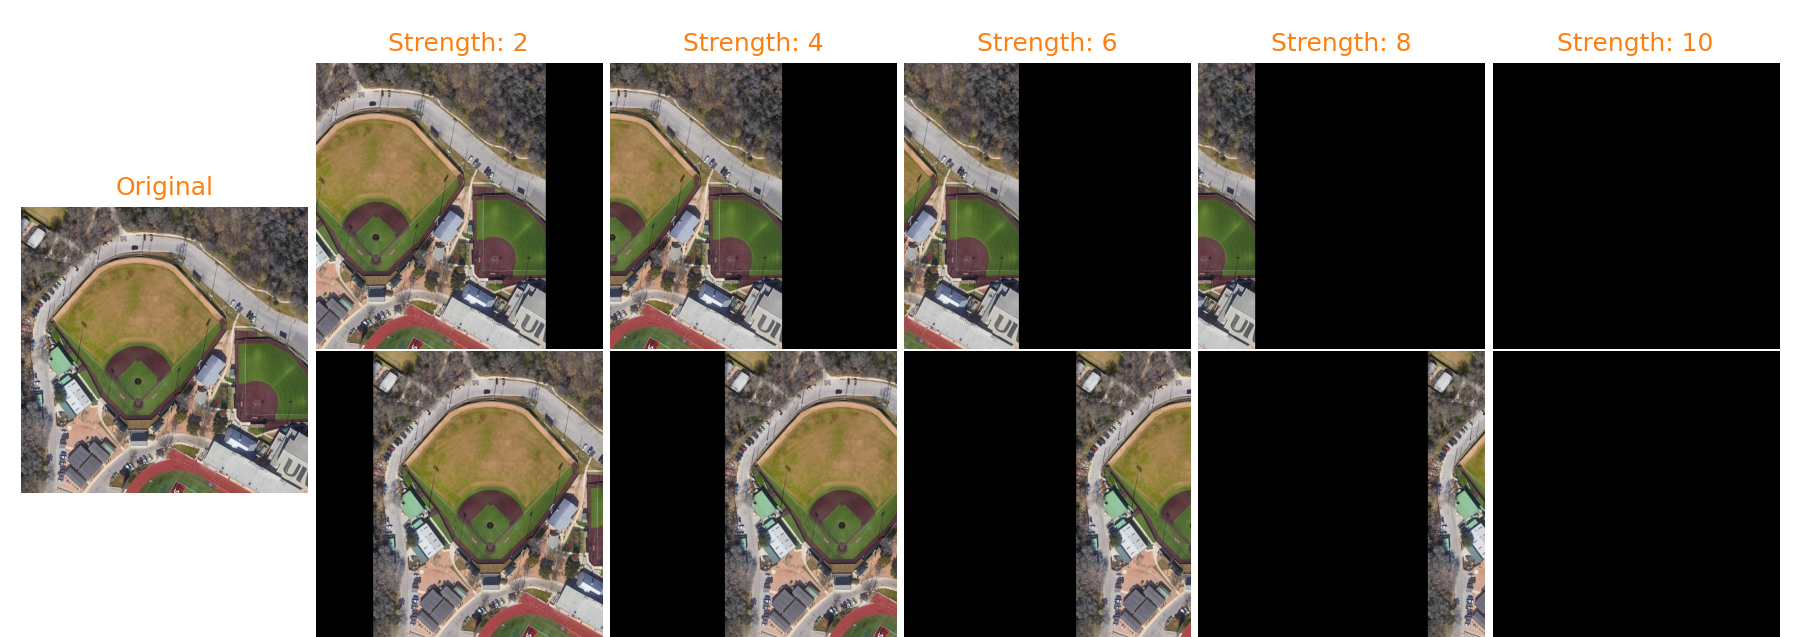
Horizontal Translation (TranslateX)
The Horizontal Translation transform shifts an image left or right by a randomly chosen amount. If an image is shifted left, it is padded on the right with 0s. If an image is shifted right, it is padded on the left with 0s.
Figure 10: Impact of horizontal translation adjustments on an example image
Vertical Translation (TranslateY)
The Vertical Translation transform shifts an image up or down by a randomly chosen amount. If an image is shifted up, it is padded on the bottom with 0s. If an image is shifted down, it is padded on the top with 0s.
Figure 11: Impact of vertical translation adjustments to an example image