Training Blueprints
What Is a Training Blueprint?
A training Blueprint defines a training loop in Chariot. Primarily, each Blueprint is defined by a container image with the training loop code, and a configuration schema to specify the format of inputs, hyperparameters, and configurations for the training run.
Two Blueprints come bundled with Chariot: teddy and teddy_wizard. These Blueprints are developed by Striveworks and support various machine learning tasks including image classification, image segmentation, object detection, text classification, and token classification. The Blueprint images for teddy and teddy_wizard are written in Python and heavily utilize PyTorch.
Users can also create their own Blueprints based on any popular or custom machine learning framework. Once the Blueprint is registered with Chariot, the platform enables users to train models based on their Blueprint. Blueprint authors can utilize the Blueprint Toolkit Python library to interact with dataset management, training checkpoint and metrics tracking, and other functionality in the Chariot platform.
Training a Model Using a Blueprint
After selecting Create Training Run from the training run home page, select the option for Use blueprint (custom configuration).

In the Blueprint drop-down menu on the next page, you should be able to select from any available Blueprint, whether it was created by Striveworks, you, or another user in your project.
On this page, you will also be asked to select the Blueprint version and the task type you are training on. You will then be asked to paste or upload a JSON configuration that matches the expected input format for the Blueprint that you want to train with.
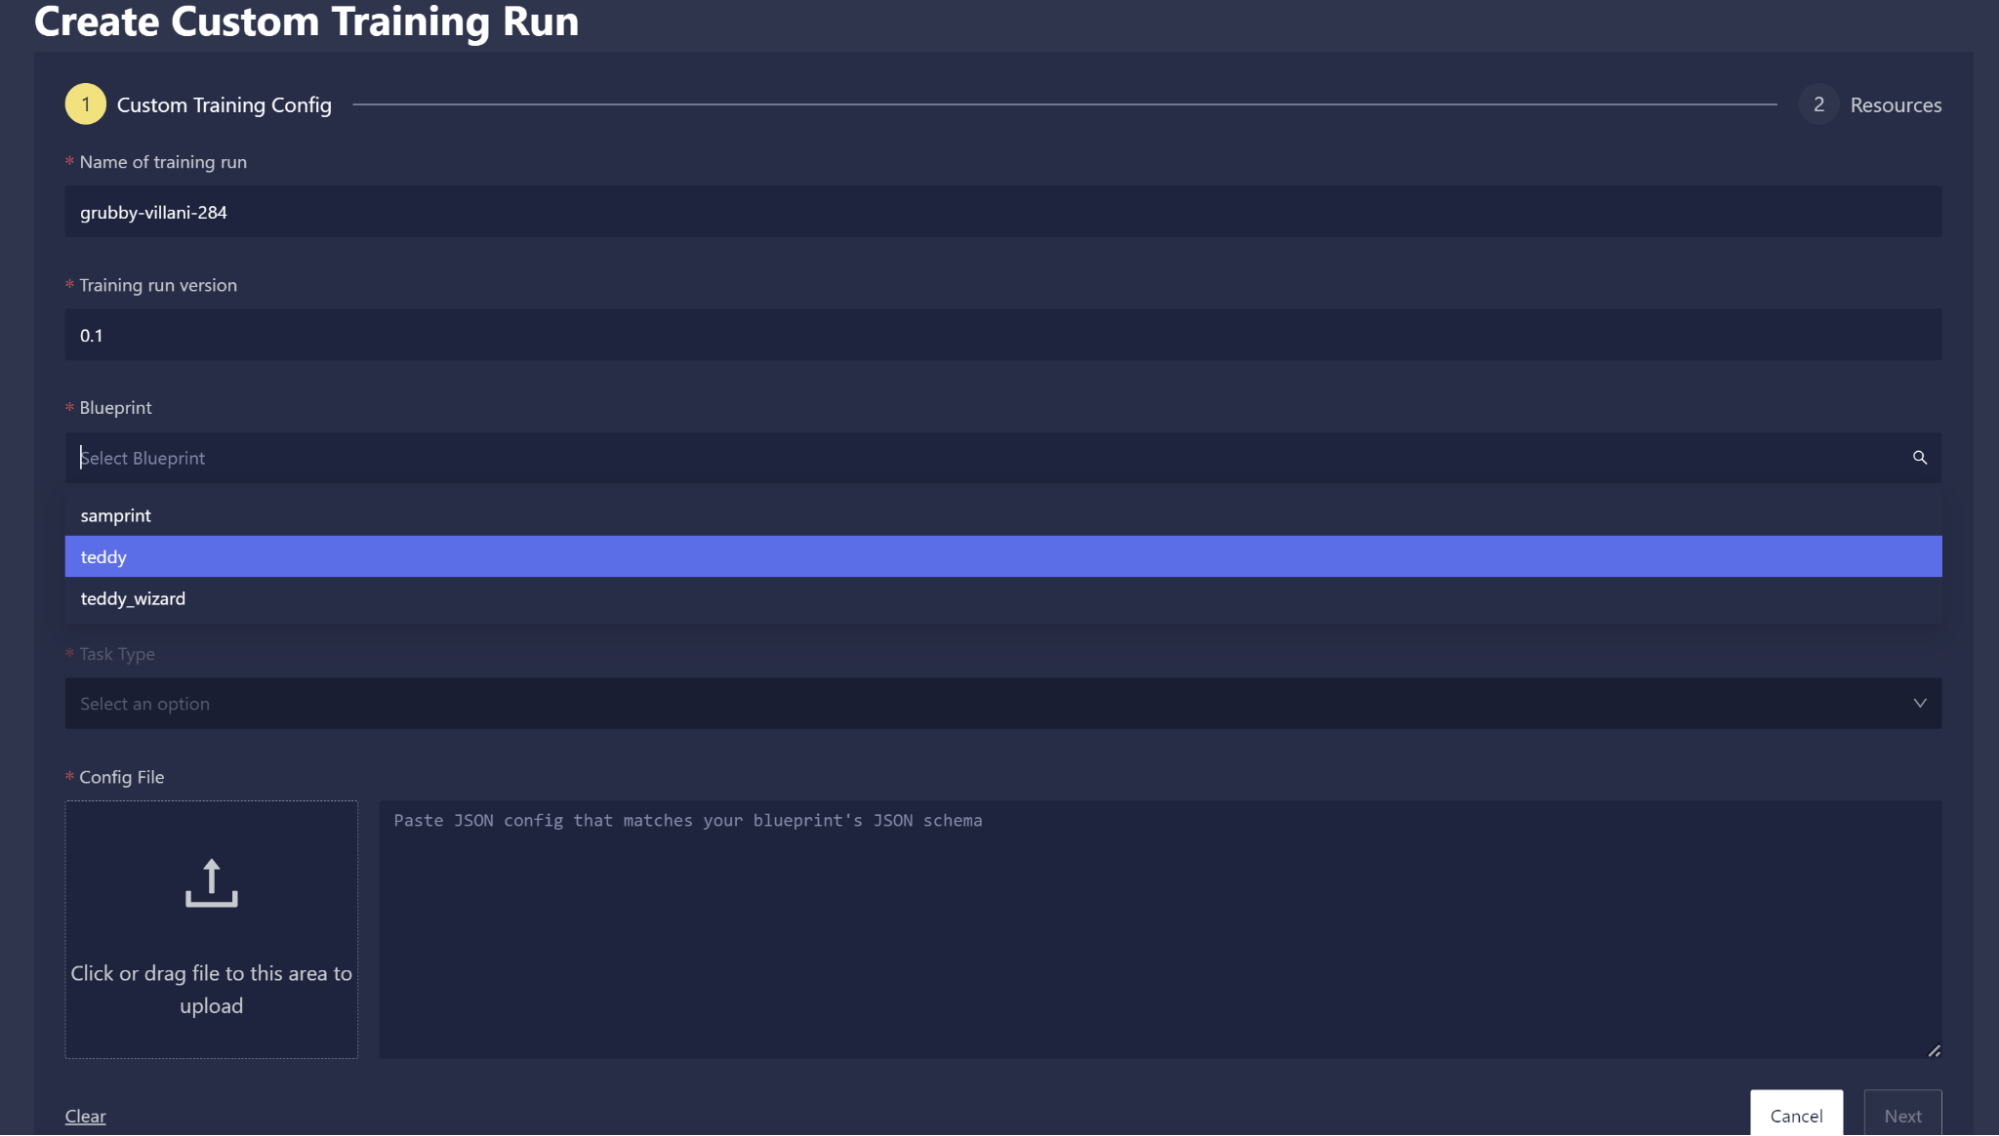
After clicking Next, you will be able to select the resources you wish to train on, and then you can then start training your model.
Creating Your Own Blueprint
Users experienced with machine learning are encouraged to create their own training Blueprints if what is natively supported in Chariot does not match their training needs. To create a Blueprint, you'll follow these high-level steps:
- Write your training loop code: Using your favorite programming language and machine learning framework, write code to train a machine learning model(s). You'll want to think about how to configure the training loop and ensure that those parameters are well organized in a single configuration object or structure. If you use Python, you can utilize Striveworks' Blueprint Toolkit to help your training loop integrate with the Chariot platform. We highly recommend testing locally using the toolkit to speed up development time.
- Publish a container image with your training loop code: Once your code is written and tested locally, you should create an OCI container image from the training code. If your Chariot instance is connected to the public internet, you can host your container in any public registry (e.g., DockerHub, ghcr). Otherwise, contact your system administrator to help determine the best way to host your Blueprint container image.
- Register your Blueprint: At this point, most of the hard work is done. However, you still need to register your Blueprint with Chariot's training API. You will specify the name of your Blueprint and the container image to run. You'll also specify metadata, such as documentation information, and an icon for users to find your Blueprint in the Chariot UI. Importantly, you'll specify a JSON Schema for your Blueprint's configuration in order to allow users to configure each training run they create using your Blueprint.
In the following sections, we will guide you through the process of creating your own Blueprint. First, follow along with a basic example, and then learn how the Blueprint Toolkit in Python can help you write custom training loop code that interacts with Chariot.
Creating an Example Blueprint
This section includes a step-by-step walkthrough for developing a new Blueprint that trains an image classification model. We will use the Blueprint Toolkit in Python to assist in building and registering the Blueprint. Once you are familiar with this process, you can adapt the instructions to your preferred training frameworks and task types.
Step 1: Set up your environment and install the toolkit
You can use your preferred local environment to manage dependencies and develop the Blueprint. However, in this example, we'll use Chariot's on-platform integrated development environment called Workspaces to simplify dependency management. First, create a Workspace using VS Code with at least 56 GiB of disk space:

Refer to the Workspaces documentation for more information on how to configure a Workspace.
Then, open a terminal in the VS Code Workspace instance (Ctrl + Shift + `) and download the example Blueprint using the following commands:
pip download --no-deps --pre --no-binary blueprint-example blueprint-example && \
    tar -xzf blueprint_example*.tar.gz && \
    rm blueprint_example*.tar.gz && \
    mv blueprint_example* blueprint-example && \
    cd blueprint-example && \
    rm -rf *.egg-info pyproject.toml setup.cfg setup.py PKG-INFO && \
    mv Containerfile.public Containerfile
If you are using a local development environment, you can still access the example Blueprint and the Blueprint Toolkit via Chariot's PyPI repository, . Armory comes bundled with all Chariot installations and hosts Striveworks' Python packages. If you are working in a local environment, you will need to use an API token from your Chariot page to authenticate. In a Workspace, no authentication to Armory is required.
Step 2: Define the training loop
You'll notice that the example Blueprint contains a file called train.py in the folder blueprint-example/blueprint_example. This file contains a typical PyTorch-based image classification training loop. The training code fetches data from Chariot's datasets API:
datasets = load_chariot_vision_datasets(
    class_to_idx=config.class_to_idx,
    train_snapshots=[
        {"snapshot_id": ds.snapshot_id, "split": ds.split}
        for ds in config.train_data.datasets
    ],
    val_snapshots=[
        {"snapshot_id": ds.snapshot_id, "split": ds.split}
        for ds in config.val_data.datasets
    ],
    train_transform=transform,
    val_transform=transform,
    cache_mode=config.cache_mode,
    cache_root=config.cache_root,
)
class_to_idx = datasets.class_to_idx
idx_to_class = config.idx_to_class or {i: c for c, i in class_to_idx.items()}
train_datasets = datasets.train_datasets
val_datasets = datasets.val_datasets
Data is typically loaded from Chariot using a Snapshot ID and a split. Since Snapshots are immutable, they are helpful for creating reproducible training runs.
load_chariot_vision_datasets generates a PyTorch-compatible dataset for each Snapshot ID provided for train, val, and test data splits. It can also generate a class_to_idx mapping, which maps all class labels in the provided Snapshots to unique integer IDs, or you can specify your own mapping, as is done in the example, by specifying the class_to_idx parameter. Depending on the value of the cache_mode parameter, the data in the datasets will either be streamed on demand, streamed and cached, or prefetched and cached. The cache_root parameter specifies the root directory of the cache.
train.py also updates the training API with progress as it continues through the training loop:
run_context.save_progress(
    [
        dict(
            operation="Training",
            value=global_step,
            final_value=n_global_steps,
            units="steps",
        )
    ],
)
While evaluating the model on the validation data, train.py specifies metrics that will be populated on the training run's metrics page in the UI. Chariot's native Blueprints provide a range of useful metrics per task type, but to simplify this example, we will only record and log classification accuracy. You can specify any number of metrics as long as you provide a value and tag, as shown below:
accuracy = correct_predictions / total_predictions
tag = "val/accuracy"
logging.info(
    f"Evaluated: step {global_step}/{config.n_global_steps}, {tag}: {accuracy}"
)

run_context.save_metrics(
    metrics=[
        dict(
            global_step=global_step,
            tag=tag,
            value=accuracy,
        )
    ],
)
Step 3: Define the expected configuration input for your Blueprint
As a Blueprint creator, you can customize the inputs to your Blueprint. You can accept as many or as few settings and parameters as you wish to expose. These inputs will be provided by users when they create a training run using your Blueprint.
When you register your Blueprint with Chariot (see the steps below), you will specify your inputs via a JSON Schema, which the Pydantic Python package can generate from a configuration class definition with type annotations. The Blueprint toolkit provides standard dataclasses for specifying Chariot dataset Snapshots (ChariotDatasetSnapshot) and Chariot models (ChariotModel) that you can include in your configuration class.
In this Blueprint example, limited inputs such as learning rate, number of steps, and evaluation frequency are defined in the config.py file:
from typing import Literal

from blueprint_toolkit import ChariotCheckpoint, ChariotDatasetSnapshot, ChariotModel
from pydantic import BaseModel, PositiveInt, StrictStr


class ImageFolderDataset(BaseModel):
    root: StrictStr
    """Root directory of the dataset."""


class Config(BaseModel):
    lr: float = 3e-4
    """Optimizer learning rate"""
    batch_size: PositiveInt = 32
    """Batch size"""
    n_global_steps: PositiveInt = 100
    """Number of batches to train"""
    ckpt_global_step_period: PositiveInt = 25
    """Step frequency to save checkpoints"""
    eval_global_step_period: PositiveInt = 25
    """Step frequency to evaluate the model"""
    train_loss_global_step_period: PositiveInt = 10
    """Step frequency to save training loss"""
    train_data: list[ChariotDatasetSnapshot] | ImageFolderDataset
    """Training datasets"""
    val_data: list[ChariotDatasetSnapshot] | ImageFolderDataset
    """Validation datasets"""
    class_to_idx: dict[str, int] | None = None
    """Mapping from class label name to integer id
    By default, this is built from all sorted class labels in the datasets."""
    idx_to_class: dict[int, str] | None = None
    """Mapping from integer id to class label name
    By default, this is built from all sorted class labels in the datasets."""
    start_model: ChariotModel | ChariotCheckpoint | None = None
    """The Chariot model or checkpoint to start from"""
    cache_mode: Literal["cache", "prefetch"] | None = None
    """The cache mode to use. If ``None``, caching is disabled.
    If ``"cache"``, datasets are streamed and cached under the directory specified
    by ``cache_root``. If ``"prefetch"``, datasets are preloaded and cached."""
    cache_root: str = "."
    """Root directory of the cache."""
Step 4: Set up the Blueprint registration script
Lastly, there is a file called create_blueprint.py, which has a script to register the Blueprint with Chariot's training API:
blueprint_id = api_client.create_blueprint(
    project_id=args.project_id,
    name=name,
    version=version,
    image=args.image,
    command=["python", "-m", "blueprint_example", "--run-id", "$(RUN_ID)"],
    supported_task_types=["Image Classification"],
    config_json_schema=Config.model_json_schema(),
)
The example Blueprint's entrypoint in __main__.py takes a --run-id parameter on the command line. This run-id will be provided by the Chariot training service when starting a training run using this Blueprint. The Blueprint, via the blueprint-toolkit, will then query the Chariot training API using this run-id in order to save and load relevant information about the training run.
In order to specify the --run-id when a training run is created, the create_blueprint.py script contains the following:
command=["python", "-m", "blueprint_example", "--run-id", "$(RUN_ID)"],
This $(RUN_ID) parameter is automatically injected whenever a training run begins with your Blueprint.
The create_blueprint.py script also provides a config_json_schema by utilizing the pydantic package to convert the Python Config class into a JSON Schema:
config_json_schema=Config.model_json_schema(),
The training API will then ensure that any training runs created for this Blueprint have inputs that adhere to the expected configuration schema.
Note: When defining the supported_task_types list for your Blueprint, each task type should be written with the first letter of each word capitalized and words separated by a single space (e.g., ["Image Classification", "Object Detection", ...]). This convention is used by internally developed Blueprints and other services besides training. Additionally, you can find the unique list of task types supported across all Blueprints with this . There is also a method on the ApiClient from the blueprint-toolkit, which allows for programmatic access to this endpoint:
from blueprint_toolkit import ApiClient

api_client = ApiClient()
all_supported_task_types = api_client.get_blueprints_task_types()
print(all_supported_task_types)
# ["Image Classification", "Object Detection", "Token Classification", ...]
If one of the returned task types aligns with your Blueprint, you should use that task type rather than creating a new one (e.g., if Image Classification exists, don't use image classification or Image-Classification, use Image Classification).
Step 5: Build the container image
Now that we have explored our Blueprint code, we need to create a container image of the code and publish it. In this example, we will build the container locally and push it to the public GitHub Container Registry.
Due to security requirements, your container will always run as user 1000 in Chariot, so make sure your container is compatible with running as user 1000 (e.g., nothing requires running as root).
At this point, it is highly recommended to test your Blueprint locally. You can utilize the LocalRunContext in the blueprint-toolkit in order to mock calls to Chariot APIs and test your Blueprint locally. However, for this example, we jump straight to publishing the container image for our Blueprint. See the blueprint-toolkit documentation for more information on testing your Blueprint locally.
Please work with your system administrator to determine the best DevOps practices for publishing your Blueprint. Container hosting requirements and configurations vary across Chariot installations.
Notice that the example Blueprint contains a Containerfile in the blueprint_example folder. This containerfile starts with a cuda base image to enable the use of NVIDIA GPUs. It then installs the necessary dependencies and copies the local Blueprint code into the container image.
Push to GitHub Container Registry
Before we build the container image, we'll configure our GitHub account. First, set your GitHub username as a command line environment variable:
GH_USERNAME=<your GitHub username>
Next, we need to generate a GitHub token to allow us to push to the GitHub Container Registry. Go to your GitHub tokens page, and generate a new token with write:packages scope:
echo "<token from GitHub tokens page>" | podman login ghcr.io -u ${GH_USERNAME} --password-stdin
Blueprint versioning allows you to iterate and improve the same Blueprint over time. In the Chariot UI, users will be able to select from any version of your Blueprint to train a model. We will set our Blueprint version number and then build the container image:
BLUEPRINT_VERSION=0.0.1
podman build . -t ghcr.io/${GH_USERNAME}/blueprint-example:${BLUEPRINT_VERSION}
If you are using a local environment and not Chariot Workspaces, there is an additional authentication step to access using the Chariot token from your page:
echo "<chariot token from profile page>" > chariot.token
podman build . --secret id=token,src=chariot.token --build-arg CHARIOT_HOST=<chariot environment>.chariot.striveworks.us -t ghcr.io/${GH_USERNAME}/blueprint-example:${BLUEPRINT_VERSION}
Finally, push your container image to the GitHub Container Registry (ghcr):
podman push ghcr.io/${GH_USERNAME}/blueprint-example:${BLUEPRINT_VERSION}
Configure a Chariot Secret
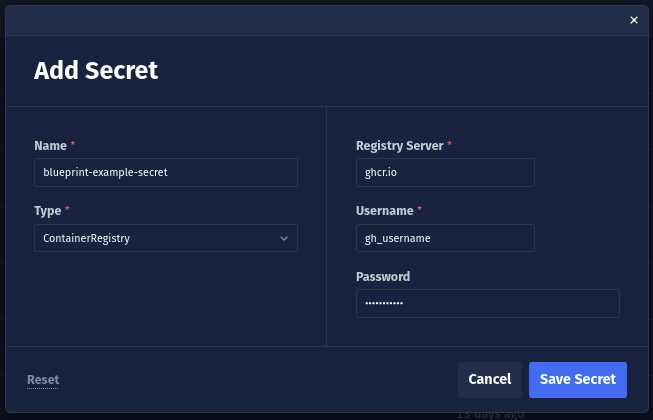
Next, we will create a secret, which includes our GitHub Container Registry credentials. First, visit the project you want to create the Blueprint in. Then, on the Secrets tab, create a secret using the ContainerRegistry type, including your GitHub username and token from the GitHub tokens page:
Next, copy the secret's ID:

Then, in the create_blueprint.py script, update the container_registry_secret to reference this ID:
blueprint_id = api_client.create_blueprint(
    project_id=args.project_id,
    name=name,
    version=version,
    image=args.image,
    command=["python", "-m", "blueprint_example", "--run-id", "$(RUN_ID)"],
    supported_task_types=["Image Classification"],
    config_json_schema=Config.model_json_schema(),
    container_registry_secret="<id copied from secrets tab>" # <-- Update this value
)
Now, when Chariot creates a training run using the new Blueprint image, it will be able to fetch the image using these private credentials.
Step 6: Register the Blueprint with Chariot
Now that the container image has been published, you need to register the Blueprint with Chariot's training API by running the create_blueprint.py script.
First, we need to create a Chariot client. Go to your and create a new client. Then, set the following environment variables:
# Because we're using a workspace, we can use the inside-cluster
# URL for the Chariot gateway
export BASE_URL="http://chariot-gateway-proxy"
export CLIENT_ID=<client id generated from profile>
export CLIENT_SECRET=<client secret generated from profile>
Then, decide which project you want to create your Blueprint in. Your Blueprint will only be usable by other Chariot users inside the same project. Once you visit a project in the Chariot UI, you can retrieve the project ID using the URL: https://%%CHARIOT-HOST%%/projects/<project_id>.
Finally, you can install the Python dependencies locally and create the Blueprint:
python -m venv .env && source .env/bin/activate
pip install blueprint-toolkit pydantic==2.4.2
python -m blueprint_example.create_blueprint --image ghcr.io/${GH_USERNAME}/blueprint-example:${BLUEPRINT_VERSION} --project-id <project_id>
If you are using a local environment and not Chariot Workspaces, there is an additional authentication step to access using the Chariot token from your page. You'll need to replace the line pip install blueprint-toolkit pydantic==2.4.2 with pip install -i https://<chariot token from profile page>@%%CHARIOT-HOST%%/armory/simple/ blueprint-toolkit pydantic==2.4.2.
Blueprint images should be immutable. If you update the code for your Blueprint, create a new container image with a new tag, and create a new Blueprint version corresponding to the new image. Do not update an existing image in place.
Step 7: Use the Blueprint to train a model
At this point, you have created and registered the Blueprint, and now comes the fun part: training a model! You can follow the steps to start a training run using a custom Blueprint.
In the config field in the UI, enter a configuration that matches the expected input you defined in config.py. For this example Blueprint you can use:
{
    "lr": 3e-4,
    "batch_size": 32,
    "n_global_steps": 10000,
    "ckpt_global_step_period": 1000,
    "eval_global_step_period": 1000,
    "train_data": [
        {
            "snapshot_id": "<some Chariot image classification dataset snapshot id>",
            "split": "train"
        }
    ],
    "val_data": [
        {
            "snapshot_id": "<some Chariot image classification dataset snapshot id>",
            "split": "val"
        }
    ]
}
You can now monitor your training run in the UI.
The Blueprint Toolkit
The Blueprint Toolkit is a Python library to help Blueprint authors interact with the Chariot platform within their training loops. It is currently composed of a framework-agnostic package, blueprint_toolkit, and a PyTorch-specific package, blueprint_toolkit_pytorch. API reference documentation for both packages, as well as for the Blueprint example that uses those packages, is available through these links:
A brief overview of how to use these packages is included below.
The RunContext Object
Most interactions with the Chariot platform are facilitated by a RunContext object. You can create one as follows:
from blueprint_toolkit import chariot_run_context

run_id = "my-run-id"
with chariot_run_context(run_id=run_id) as run_context:
    print(run_context.load_config())
The RunContext should be created once and reused during the lifetime of the training run.
In order to speed up the time it takes to create and test your Blueprint, we recommend testing your Blueprint locally. To do so, use the function local_run_context to obtain a RunContext object that does not call Chariot APIs but rather uses local files and in-memory data structures to mock calls to Chariot. We recommend testing your Blueprint using this local implementation on your local machine prior to publishing your Blueprint.
from blueprint_toolkit import local_run_context

run_id = "my-run-id"
config = {"n_global_steps": 100}
with local_run_context(run_id=run_id, config=config, base_dir="./data-dir") as run_context:
    print(run_context.load_config())
Note that in this example we use the RunContext to load the configuration object for the training run. The configuration is specified by the user who created the training run and should specify hyperparameters like the learning rate and important configuration information such as the datasets to train on.
The ApiClient Object and Chariot Authentication
Many classes in the blueprint-toolkit utilize an ApiClient to access Chariot APIs. Typically, the ApiClient is an optional parameter to various __init__s and functions. For example, the function chariot_run_context takes an optional ApiClient:
def chariot_run_context(
    *, run_id: str, api_client: ApiClient | None = None
) -> RunContext:
If the ApiClient is not provided, a default one is created. By default, the ApiClient reads environment variables to authenticate with Chariot. To set them in your terminal, first retrieve a Chariot client ID and secret from your page. Then run:
export BASE_URL=<base url>
export CLIENT_ID=<client id generated from profile>
export CLIENT_SECRET=<client secret generated from profile>
The base URL of this Chariot instance is https://%%CHARIOT-HOST%%.
Alternatively, you can explicitly create an ApiClient with these configurations, and then pass the ApiClient into various blueprint-toolkit classes and functions:
api_client = ApiClient(
    base_url="<base_url>",
    client_id="<client id generated from profile>",
    client_secret="<client secret generated from profile>"
)
with chariot_run_context(run_id=run_id, api_client=api_client) as run_context:
    print(run_context.load_config())
When your Blueprint executes via Chariot's training API, the environment variables BASE_URL, CLIENT_ID, and CLIENT_SECRET are automatically set. However, if you are working in a Workspace or a local development environment, you must specify these variables to interact with Chariot APIs.
Loading a Pretrained Model
The RunContext allows you to fetch an already-trained Chariot model for fine-tuning. To do so, utilize load_model:
import torch
import torchvision

model = torchvision.models.resnet18()

model_id = "my-model-id"
with run_context.load_model(model_id) as model_data:
    model.load_state_dict(torch.load(model_data.dir / "model.pth"))
The directory path specified by model_data.dir will contain the model files associated with the loaded model. You can access it just like a local directory to retrieve model weights files that might be stored as model data.
Posting Run Progress and Metrics
The Chariot training API allows Blueprints to track their progress throughout the training process. This allows users to visualize the completion percentage of the training run in the Chariot UI:
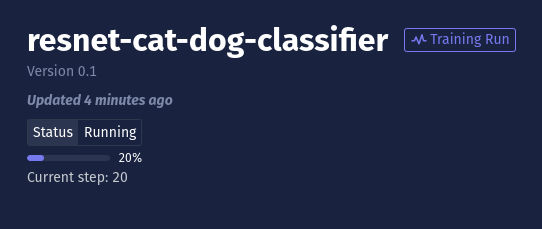
For example, it is expected that Blueprints will update the training API each time the training loop step changes using an operation called "Training." However, it is also possible to save progress for more fine-grained parts of the training process, such as evaluating the model on validation data.
The primary progress operation, "Training," should represent the percent of the training run that is complete. To save progress, call run_context.save_progress. For example:
while global_step < n_global_steps:
   global_step += 1
   # Not shown: update model for training step...
   run_context.save_progress([
        {
            # the action underway in the training run
            "operation": "Training",
            # the current value representing progress of the `operation`
            "value": global_step,
            # the value `value` will reach when the `operation` is completed
            "final_value": n_global_steps,
            # the units of `value` and `final_value`
            "units": "steps",
        }
   ])
If you prefer to define your training progress in terms of the number of epochs, that's perfectly fine too:
from blueprint_toolkit import SaveProgressDict

while epoch < n_epochs:
   epoch += 1
   # Not shown: update model for training epoch...
   run_context.save_progress([
        {
            "operation": "Training",
            "value": epoch,
            "final_value": n_epochs,
            "units": "epochs",
        }
   ])
Saving and Loading Checkpoints
Your Blueprint should save training checkpoints periodically in order to allow training to restart without significant data loss in the event of an issue with, or a pause of, the training process.
The RunContext object provides a save_checkpoint method for saving checkpoints. It returns a temporary directory where you should save any model weights, optimizer state, etc.
For example, when using PyTorch, you can save a checkpoint like this:
import torch
import torchvision
import os

model = torchvision.models.resnet18()
optimizer = torch.optim.Adam(model.parameters())

global_step = 0
while global_step < n_global_steps:
    global_step += 1

    # Somewhere inside your training loop, every n training steps...
    with run_context.save_checkpoint(global_step=global_step) as checkpoint:
        torch.save(model.state_dict(), checkpoint.dir / "model.pth")
        torch.save(optimizer.state_dict(), checkpoint.dir / "optimizer.pth")
When the checkpoint_dir scope is exited, the checkpoint directory should no longer be used, and its contents will be saved to Chariot (for ChariotRunContext) or the local file system (for LocalRunContext).
Your Blueprint should also be able to resume training from a checkpoint. Many Blueprints will start training from the latest saved checkpoint for the training run that is currently executing. It is also possible to include a configuration value for your Blueprint to indicate the checkpoint to start from. The method load_checkpoint returns an object containing details about the loaded checkpoint, including a path to its files and global step.
from blueprint_toolkit import CheckpointNotFoundError

global_step = 0
try:
    # By default, load_checkpoint() with no parameters
    # tries to load the latest saved checkpoint for this
    # training run id. If none has been saved yet,
    # it raises a CheckpointNotFoundError
    with run_context.load_checkpoint() as checkpoint:
        global_step = checkpoint.global_step
        model.load_state_dict(torch.load(checkpoint.dir / "model.pth"))
        optimizer.load_state_dict(torch.load(checkpoint.dir / "optimizer.pth"))
except CheckpointNotFoundError:
    # Cannot load from latest checkpoint - no checkpoints exist
    pass
In order for Chariot to be able to catalog your checkpoints as models,
you will need to include a chariot_model_config.json file in your checkpoint
conforming to the schema specified by blueprint_toolkit.ChariotModelConfigDict.
In particular, this JSON file should contain four fields:
artifact_type(str): The artifact type or framework of the model. Currently supported:pytorch,huggingfaceclass_labels(dict[str, int]): Mapping from class labels to integer IDscopy_key_suffixes(list[str]): List of S3 key suffixes from the checkpoint to include in the modeltags(dict[str, str]): Additional key value tags to associate with the model
If artifact_type is pytorch, Chariot expects your PyTorch model to be saved as a
model.mar file, a torch model archive (MAR) file, under a model-store directory.
The example Blueprint provides an example of
and
such models with a custom inference handler and the required chariot_model_config.json file.
Accessing Datasets
The Blueprint toolkit contains low-level APIs for accessing datasets within Chariot. However, we recommend using framework-specific dataset wrappers when possible.
For PyTorch-specific datasets, you can utilize the blueprint-toolkit-pytorch package:
from blueprint_toolkit_pytorch import load_chariot_vision_datasets

datasets = load_chariot_vision_datasets(
    train_snapshots=[{"snapshot_id": chariot_dataset_snapshot_id, "split": "train"}],
    val_snapshots=[{"snapshot_id": chariot_dataset_snapshot_id, "split": "val"}],
    cache_mode=cache_mode,
    cache_root=cache_root,
)
train_ds = datasets.train_datasets[0]
val_ds = datasets.val_datasets[0]

# train_ds and val_ds are now torchvision.dataset.VisionDatasets
Depending on the value of the cache_mode parameter, the data in the datasets will either be streamed on demand (cache_mode=None, the default), streamed and cached (cache_mode="cache"), or prefetched and cached (cache_mode="prefetch"). The cache_root parameter specifies the root directory of the cache and defaults to the current working directory.
These datasets can be transformed using torchvision.transforms.v2 transforms. For example:
from blueprint_toolkit_pytorch import load_chariot_vision_datasets
import torchvision.transforms.v2 as transforms

chariot_dataset_snapshot_id = "..."
datasets = load_chariot_vision_datasets(
    train_snapshots=[{"snapshot_id": chariot_dataset_snapshot_id, "split": "train"}],
    transform=transforms.Compose(
        [
            transforms.CenterCrop(224),
            transforms.Resize(256),
        ]
    )
)
train_ds = datasets.train_datasets[0]
load_chariot_vision_datasets currently supports image classification, object detection, and image segmentation Chariot datasets. These datasets are typically supplied to a torch.utils.DataLoader in order to facilitate multiprocess-based data loading. However, you can also use the datasets directly:
datum, target = train_ds[0]
For all vision datasets, the datum will be a PIL.Image.Image:
>>> print(datum)
<PIL.Image.Image image mode=RGB size=10x10 at 0x72A03AD3BA90>
Image Classification
For image classification, the target will be an int corresponding to a class label of the object:
>>> print(target)
0
>>> print(train_ds.class_to_idx)
{'dog': 0, 'cat': 1}
Object Detection
For object detection, the target will be a dict with the bounding boxes for each detection annotation:
>>> print(target)
{
    'boxes': BoundingBoxes(
            [
                [2, 1, 3, 2],
                [8, 7, 9, 8]
            ],
            format=BoundingBoxFormat.XYXY,
            canvas_size=(10, 10)
        ),
    'labels': tensor([0, 0])
}
For this target, there are two dogs annotated in the image. The corners of the bounding boxes of each dog are at pixel coordinates (2, 1), (3, 2) and (8, 7), (9, 8). With object detection, boxes will be a torchvision.tv_tensors.BoundingBoxes, and labels will be a tensor with ints corresponding to class indexes (accessible via train_ds.class_to_idx).
Image Segmentation
For image segmentation, target will be a dict with the masks for each segmentation annotation:
>>> print(target)
{
    'masks': Mask([
        [[False, False, False, False, False, False, False, False, False, False],
        [False,  True,  True,  True,  True,  True,  True,  True,  True,  True],
        [False,  True,  True,  True,  True,  True,  True,  True,  True,  True],
        [False,  True,  True,  True,  True,  True,  True,  True,  True,  True],
        [False, False, False, False, False, False, False, False, False, False],
        [False, False, False, False, False, False, False, False, False, False],
        [False, False, False, False, False, False, False, False, False, False],
        [False, False, False, False, False, False, False, False, False, False],
        [False, False, False, False, False, False, False, False, False, False],
        [False, False, False, False, False, False, False, False, False, False]]]),
    'labels': tensor([0])
}
masks is a torchvision.tv_tensors.Mask of size (<num annotations>, <image size x>, <image size y>). labels is a tensor of size (<num annotations>, ), where each label is an integer corresponding to a class index.
Loading Configurations
When you register your Blueprint, you must specify a JSON Schema for the configuration of your Blueprint. The training API will then guarantee that all configurations provided to your Blueprint adhere to its configuration JSON Schema. We recommend using the pydantic Python library to generate your config object. For example:
from pydantic import BaseModel, StrictInt

class MyBlueprintConfig(BaseModel):
    n_global_steps: StrictInt
    """The number of steps to train for"""
Then, when registering your Blueprint, you can easily provide the JSON Schema for your configuration by calling:
MyBlueprintConfig.model_json_schema()
See how to register a Blueprint in the step-by-step Blueprint creation example here.
When running your training code, you can then load and parse the user-provided config:
run_config = MyBlueprintConfig.model_validate(run_context.load_config())
Handling Manual Termination
If a training run is stopped while inside a RunContext, a RunContextInterruptedError will be raised by the context manager. By default, this will exit any nested context managers that may be active and will gracefully stop the main process. It is possible to run arbitrary functions on shutdown simply by catching the RunContextInterruptedError exception inside the context manager. For example:
from blueprint_toolit import chariot_run_context, RunContextInterruptedError

with chariot_run_context(run_id=config.run_id) as rc:
    global_step = 0
    try:
        while global_step > 0:
            train_step()
    except RunContextInterruptedError as e:
        logging.info("Training was interrupted")
        on_shutdown_func()
The local_run_context
When using local_run_context, the training loop should operate on the returned RunContext just like using chariot_run_context. However, the local_run_context allows you to validate your training loop and create local automated tests.
To create a RunContext using local_run_context, you'll need to provide the run ID, configuration object, and a base_dir. The base_dir is where the RunContext will read and write all of the on-disk data from your training run, including checkpoints and models.
Configuration
For configurations, local_run_context simply returns the provided configurations. Since there is no connection to Chariot, the configuration cannot be determined via the run ID and must be provided explicitly:
from blueprint_toolkit import local_run_context

run_id = "my-run-id"
config = {"n_global_steps": 100}
with local_run_context(run_id=run_id, config=config, base_dir="./data-dir") as run_context:
    print(run_context.load_config())
    # {'n_global_steps': 100}
The run ID can be any arbitrary value since it is not actually sent to the training API.
Models
If your training loop loads models, you can save model files to disk under <base_dir>/models/<model_id>. Then, when the training loop loads the model using run_context.load_model, any models saved on disk can be accessed.
Progress
To read the latest progress value saved from a run_context.save_progress call, you can use run_context.progress_saver.current_progress:
>>> print(run_context.progress_saver.current_progress)
[{'operation': 'Training', 'final_value': 15, 'units': 'steps', 'value': 5}]
Progress is only saved in memory and is not persisted to disk.
Metrics
To read any metrics saved from run_context.save_metrics calls, you can use run_context.metric_saver.metrics:
>>> print(run_context.metric_saver.metrics)
[{'global_step': 5, 'tag': 'val/accuracy', 'value': 0.0}]
Metrics are only saved in memory and are not persisted to disk.
Checkpoints
To read any checkpoints saved from run_context.save_checkpoint calls, you can use run_context.load_checkpoint:
with r.load_checkpoint() as ckpt:
    assert ckpt.dir.exists()
When using local_run_context, checkpoints are saved to disk under the path <base_dir>/runs/<run_id>/checkpoints/<checkpoint_id>/.
Blueprints Installed With Chariot
yolo_obb
The yolo_obb Blueprint is included with some installations of Chariot and enables training of Ultralytics' YOLOv8 Oriented Bounding Box models.
Configuration
An example minimal configuration for a yolo_obb training run is below:
{
  "datasets": {
    "train_data": [
      {
        "snapshot_id": "<some Chariot dataset snapshot id>",
        "split": "train"
      }
    ],
    "val_data": [
      {
        "snapshot_id": "<some Chariot dataset snapshot id>",
        "split": "val"
      }
    ]
  },
  "ckpt_epoch_period": 5, // How often to save checkpoints (in epochs)
  "epochs": 100, // Number of epochs to train before stopping
  "batch_size": 16, // Training and validation batch size
  "resize_to": 640 // Image resize dimensions (in pixels)
}
If you'd like to fine-tune a Chariot model, you can optionally include the "start_model" key:
"start_model": {"model_id": "<some Chariot model id>"}
If you'd like to start training from a previously saved Chariot checkpoint, use a "checkpoint_id" instead of a "model_id":
"start_model": {"checkpoint_id": "<some Chariot checkpoint id>"}
Metrics
All metrics are calculated via the YOLO trainer and evaluator. See Ultralytics' documentation for more information on metrics saved by this blueprint.